Fork me on GitHub

12/31/2011

Blog Decoration CSS

This post records the decoration in this blog for backup. Using markdown with these decoration to write blog is awesome!

1. Code Block

pre {
    border:1px dashed #E1E1E1;
    color:#333344;
    background:#FAFAFA;
    overflow:auto;
    padding:0.5em;
}
code {
    font:$(body.code);
    line-height:28px;
}

2. Blcokquote

blockquote {
    background  : #f9f9f9;
    border-left : 10px solid #ccc;
    margin      : 1.5em 10px;
    padding     : .5em 10px;
    quotes      : "\201C""\201D""\2018""\2019";
}

3. Github Ribbon

.ribbon {
    background-color          : #a00;
    overflow                  : hidden;
    z-index                   : 1;
    position                  : absolute;
    right                     : -3em;
    top                       : 2.5em;
    -moz-transform            : rotate(45deg);
    -webkit-transform         : rotate(45deg);
    -moz-box-shadow           : 0 0 1em #888;
    -webkit-box-shadow        : 0 0 1em #888;
}
.ribbon a {
    border          : 1px solid #faa;
    color           : #fff;
    display         : block;
    font            : bold 81.25% 'Helvetiva Neue', Helvetica, Arial, sans-serif;
    margin          : 0.05em 0 0.075em 0;
    padding         : 0.5em 3.5em;
    text-align      : center;
    text-decoration : none;
    text-shadow     : 0 0 0.5em #444;
}

-- EOF --

12/30/2011

Using Git In Non Merging Way

Here is the flow I used in the past few months development wit Git

  1. First, create a branch 'base' to track the remote collaborating branch

    $ git checkout -b base -t origin/trunk
        // create a local branch 'base' to track a remote branch 'origin/trunk'
    $ git branch -a
        // show the detail info about local/remote branches
    $ git remote show origin
        // to know which local branch tracks which remote branch, see the bottom of output
    
  2. Any feature/hotfix are checkout to a separate feature branch from base branch, and develop on it

    $ git checkout -b 1201-fea
        // create a local branch for development
    
  3. After completing and verifying your changes, patch your changes

    $ git diff > p1225_refactor
        // output your changes to a patch file names 'p1201_fea'
    
  4. When ready to sync changes to server, update your base branch, checkout to it, then apply your patch

    $ git checkout base
    $ git pull --rebase
        // make sure the branch in the updated condition
    $ git apply p1225_refactor
        // apply your changes on top of it
    
  5. The habits which prevent you from the regular loop of conflict and merge

    Often update your 'base' branch, don't let it lag too much behind the remote trunk

    If your changes are not urgent, keep checking out a daily experiment branch from 'base' and try to apply your patch and verify it. If any conflict, you can fix it as early as posiible

    Naming your branches and patches clearly, give them some identifiable prefix or suffix

-- EOF --

12/27/2011

open drain & push pull

IC 的輸出腳位通常可以透過設定 register 來改變其輸出的 mode (Open Drain 或 Push-Pull),以下網路上找到的解釋蠻清楚的,紀錄一下。

The push-pull output actually uses two transistors. Each will be on to drive the output to the appropriate level: the top transistor will be on when the output has to be driven high and the bottom transistor will turn on when the output has to go low.

The open-drain output lacks the top transistor. When the output has to go high you simply turn off the bottom transistor, but the line is now pulled high only by the pullup resistor.

Your micro allows you to select between the two types, which means that by setting some bits in some register you actually enable/ disable the top transistor and enable/disable the pullup (if internal, otherwise you just disable the top transistor and have to use an external pullup)

The advantage of the push-pull output is the higher speed, because the line is driven both ways. With the pullup the line can only rise as fast as the RC time constant allows. The R is the pullup, the C is the parasitic capacitance, including the pin capacitance and the board capacitance. The push-pull can typically source more current. With the open-drain the current is limited by the R and R cannot be made very small, because the lower transistor has to sink that current when the output is low; that means higher power consumption.

However, the open-drain allows you to cshort several outputs together, with a common pullup. This is called an wired-OR connection. Now you can drive the output low with any of the IO pins. To drive it high all ouputs have to be high. This is advantageous in some situations, because it eliminates the external gates that would otherwise be required.

12/23/2011

[C] Error “initializer element is not constant” and static

嘗試著要在  static 的 struct 成員指向其他 struct 的時候 (也就是巢狀 struct),必須注意成員必須是 const,而 C 和 C++ 的 const 語意有所出入,需注意之!

It has to do with C language. In C language objects with static storage duration has to be initialized with constant expressions or with aggregate initializers containing constant expressions.
A "large" object is never a constant expression in C, even if the object is declared as const.
Moreover, in C language the term "constant" refers to literal constants (like 1,'a'0xFF and so on). Const-qualified objects (of any type) are not constants in C language terminology. They cannot be used in initializers of objects with static storage duration, regardless of their type.
For example, this is NOT a constant
const int C = 5; /* not a constant in C */
It would be a constant in C++, but it is not a constant in C. So, if you try doing
static int j = C; /* ERROR */
you will get the same error: an attempt to initialize a static object with a non-constant.
-- EOF --

12/18/2011

Use CMake to setup OpenCV environment, and use CMake variable to link installed OpenCV lib

OpenCV 是一個好用的 computer vision open source library,自從 2.0 版本之後就開始採用 CMake 的建構系統,讓整個安裝和跨平台的使用上變得相當容易!

Ubuntu 的安裝方式:
    基本上可以直接參考 Installing OpenCV 2.2 in Ubuntu 11.04 這篇文章,安裝好一些基本的 dependent lib 之後,就是到官網抓最新的 source code 下來編譯然後安裝,比較需要注意的是不要忘記 sudo gedit /etc/ld.so.conf.d/opencv.conf 然後要加入 /usr/local/lib (這樣系統才知道要去哪裡找安裝好的 library)。

Mac 的安裝方式:
    基本上和 Ubuntu 大同小異,不過要先安裝好 Xcode,安裝完不用自行加入 library path。


如何讓別人使用你寫好的 OpeCV application:
    其實安裝好 OpenCV 以後,系統就會有一些現成的 CMake 變數可以使用,如果你利用 OpenCV 開發了一些專案想要利用 CMake 建構的方式,分享給別人的話,那麼可以透過插入下面這兩行,搞定 library linking 的問題:

FIND_PACKAGE(OpenCV REQUIRED)
TARGET_LINK_LIBRARIES(main ${OpenCV_LIBS})

如果有興趣的話,在你安裝完以後,也可以 clone 一些我之前寫的 project 玩玩!例如:一個追蹤手部移動的程式,詳細運行方式請參考 README 檔案,也歡迎留言指教 :)


--- EOF ---


11/19/2011

[DISP] pixel clock, hsync, vsync 觀念

接觸 display driver 開發一陣子,經常遇到一些似懂非懂得名詞,假日的時候 google 一下,解決心中的疑惑

主要參考幾篇網路文章:
1. http://www.linuxjournal.com/article/1089
2. http://www.epanorama.net/documents/pc/vga_timing.html
3. http://kezeodsnx.pixnet.net/blog/post/24116781-display-%E7%9B%B8%E9%97%9C%E5%8E%9F%E7%90%86 (有關 pixel clock)

以下是擷取第一個網路資料的內容,簡單介紹 display 顯示畫面的原理:

TVs and monitors display the picture by scanning lines across the screen. As in a book, the first line starts at the top left of the screen and goes to the top right. Each successive line starts slightly below the previous line. This continues until the screen is full. The lines don't have to be full; the picture is formed by altering the intensity of the electron beam as it scans the lines.

To perform this scan, the TV has two deflection units: one scans from left to right, and the other scans (much more slowly) from top to bottom. Not unexpectedly, these units are called thehorizontal and vertical deflection units. You may also encounter the terms line and frame deflection. (可以把畫面形成想像成一個傳統的打字機,每打完一行,就要從尾端在移動到起始位置)

The electron beam can move at only a finite speed. When the electron beam reaches the right hand side of the screen, it needs to be deflected back again. This part of the scan is called thehorizontal retrace, and it is not used for displaying picture data. The actual time that the hardware requires for the retrace varies, but it is in the order of 5% to 10% of the total line scan time. Similarly, when the vertical deflection reaches the bottom of the screen, it performs a vertical retrace, which is also not used for display.

It's not enough to just deflect, of course; somehow you need to ensure that the scanning is synchronized with the incoming signal, so that the scan is at the top of the screen when the picture information for the top of the screen arrives. You've all seen what happens when this doesn't happen; the picture runs up and down the screen (incorrect vertical synchronization) or tears away from the left of the screen (incorrect horizontal synchronization). Synchronization is achieved by including synchronization pulses in the horizontal and vertical retrace periods. To ensure that they are recognized as synchronization pulses, they have different voltage levels from the picture data. (sync 訊號是為了確保 signal source 跟顯示出來的東西可以保持同步,否則可能會有跳frame或是tearing的現象發生)

As if that wasn't enough, the video amplifier, the part of the TV which alters the intensity of the spot as it travels across the screen, needs time to ensure that the retrace is invisible, so there are brief pauses between the end of the line and the start of the sync pulse, and again between the end of the sync pulse and the beginning of the data. This process is called blanking, and the delays are called the front porch (before the sync pulse) and theback porch (after the sync pulse). (porch 的概念就是,當顯示在做 retrace 的時候並不會 show pixel,就像採煞車一樣把 intensity 降低,這需要時間 "back porch",等到移動到定位了,要開始催油門到一定的 intensity,這也需要時間 "front porch"。

用第二篇資料的圖示會更清楚:

Horizonal Timing

Horizonal Dots         640     640     640        
Vertical Scan Lines    350     400     480
Horiz. Sync Polarity   POS     NEG     NEG
A (us)                 31.77   31.77   31.77     Scanline time
B (us)                 3.77    3.77    3.77      Sync pulse lenght 
C (us)                 1.89    1.89    1.89      Back porch
D (us)                 25.17   25.17   25.17     Active video time
E (us)                 0.94    0.94    0.94      Front porch
         ______________________          ________
________|        VIDEO         |________| VIDEO (next line)
    |-C-|----------D-----------|-E-|
__   ______________________________   ___________
  |_|                              |_|
  |B|
  |---------------A----------------|

Vertical Timing

Horizonal Dots         640     640     640
Vertical Scan Lines    350     400     480
Vert. Sync Polarity    NEG     POS     NEG      
Vertical Frequency     70Hz    70Hz    60Hz
O (ms)                 14.27   14.27   16.68     Total frame time
P (ms)                 0.06    0.06    0.06      Sync length
Q (ms)                 1.88    1.08    1.02      Back porch
R (ms)                 11.13   12.72   15.25     Active video time
S (ms)                 1.2     0.41    0.35      Front porch
         ______________________          ________
________|        VIDEO         |________|  VIDEO (next frame)
    |-Q-|----------R-----------|-S-|
__   ______________________________   ___________
  |_|                              |_|
  |P|
  |---------------O----------------|


...

10/22/2011

利用 git submodule 和 pathogen 同步 vim 套件

最近因為工作的關係,開始需要頻繁的使用 vim 和 git,果然也驗證了一個道理,若你想要快速的學會某項工具,就把自己丟到一個不能不用那個工具的環境當中,強迫自己必須用最快最有效率的速度上手那套工具,然後再慢慢進階。

每次建置開發環境都得要重新設定 vimrc 檔,以及一些慣用的 plugin,不同主機之間的同步也是個大問題。但是,自從開始使用 git submmodule 和 pathogen 一切都不再是問題,架設 vim 環境和同步不同主機之間的設定都變得輕鬆愉快。

簡單來說,這個 solution 是利用將 .vim 目錄以 git 的方式上傳到 github 上面管理,pathogen 這個 vim 套件則可以 runtime 決定套件的路徑,因此,搭配上 git submodule,套件的管理變得更加井然有序。

有興趣的朋友,我強力推薦這個 教學影片,講解相當的清晰易懂,如果你也為了在多台主機之間同步 vim 設定而煩惱,這絕對是一個一勞永逸的解法!

10/01/2011

[Vim] Vim installation on Windows and Mac

Windows (Use portable GVim)

1. Extract GVim_Portable.exe to Program Files
2. Rename GVimPortable.exe to vi.exe
3. Add path to environment variable PATH
4. Copy the pre-built cscope binary and related dll to folder where vi.exe exists
5. Put wombat.vim to C:\Program Files\GVimPortable\App\vim\vim71\colors
6. Add below at the top of vimrc

colorscheme wombat
set guifont=Monaco:h12

Note:
1. vimrc in C:\Program Files\GVimPortable\App\DefaultData\settings
2. put autoload_cscope.vim and cscope_maps.vim to C:\Program Files\GVimPortable\App\vim\vim71\plugin
3. Don't put the project root folder in path with spaces

MacOS (10.7.1)

1. Download macvim source from github: https://github.com/b4winckler/macvim
2. Download cscope from sourceforge: http://sourceforge.net/projects/cscope/files/
3. Refer the readme to build cscope, maybe you will get some errors like below:

if gcc -DHAVE_CONFIG_H -I. -I. -I..     -g -O2 -MT build.o -MD -MP -MF ".deps/build.Tpo" -c -o build.o build.c; \
    then mv -f ".deps/build.Tpo" ".deps/build.Po"; else rm -f ".deps/build.Tpo"; exit 1; fi
In file included from build.c:50:
/usr/include/ncurses.h:550:40: error: macro "cbreak" passed 1 arguments, but takes just 0
/usr/include/ncurses.h:575:44: error: macro "erasechar" passed 1 arguments, but takes just 0
/usr/include/ncurses.h:611:43: error: macro "killchar" passed 1 arguments, but takes just 0
make[2]: *** [build.o] Error 1
make[1]: *** [all-recursive] Error 1
make: *** [all] Error 2

4. How to fix it: Add the #undef and #define lines in the middle of this chunk of code in constants.h

#if (BSD || V9) && !__NetBSD__ && !__FreeBSD__
# define TERMINFO 0 /* no terminfo curses */
#else
# define TERMINFO 1
#endif

#undef TERMINFO
#define TERMINFO 1

#if !TERMINFO
# ifndef KEY_BREAK
# define KEY_BREAK 0400 /* easier to define than to add #if around the use */
# endif
# ifndef KEY_ENTER
# define KEY_ENTER 0401
# endif
# ifndef KEY_BACKSPACE
# define KEY_BACKSPACE 0402
# endif

# if !sun
# define cbreak() crmode() /* name change */
# endif

# if UNIXPC
# define erasechar() (_tty.c_cc[VERASE]) /* equivalent */
# define killchar() (_tty.c_cc[VKILL]) /* equivalent */
# else
# define erasechar() (_tty.sg_erase) /* equivalent */
# define killchar() (_tty.sg_kill) /* equivalent */
# endif /* if UNIXPC */
#endif /* if !TERMINFO */

5. Put the built cscope to usr/local/bin

...

8/30/2011

[OO] association, aggregation and composition in UML

UML 描述類別彼此間的關係,有三種表達方式: Association(關連), Aggregation(聚合) and Composition(組成)。

簡單來說,Aggregation(聚合) 是 Association(關連) 的一種特化;而 Composition(組成) 是 Aggregation(聚合) 的一種特化。

Association(關連):表達某類別中的方法參數是另一類別,或是某類別持有另一類別的指標/參考

Aggregation(聚合):表達一種 "has-a" 的關係,但是不是獨佔的 (也就是說某類別擁有另一類別,但是其他類別也可以擁有該類別)

Composition(組成):類似 Aggregation,但是更加嚴格。某類別擁有另一類別,並且掌管另一類別之生死。當該類物件被 delete,其所 "has-a" 類別也跟著死亡;並且是一種獨佔關係。


參考資料
1. Design Codes: UML Class Diagram: Association, Aggregation and Composition
2. (原創) association,aggregation,composition有什麼差別?

... ...

[DP] 繼承或合成, composition 搭配 strategy pattern 範例

簡單明瞭的機器人遊戲範例,清楚說明了 composition 搭配 strategy pattern 的強大,推薦閱讀!

繼承關係在面臨父類 介面更動 需求時,顯得不堪一擊。採用繼承的關鍵是子類 "is-a" 父類,但 更重要的是,這個 "is-a" 的關係, 是否在開發週期間恆常不變 ,如果不是的話 composition 是更好的選擇!


Don't use inheritance just to get code reuse

Don't use inheritance just to get at polymorphism


當 上層類 依賴於 組件類 (composition), 不讓 上層類 直接使用 組件 instance,而是使用一個抽象介面 ,那麼就可以達到 run-time 決定選用不同規格的組件 (因為他們都實現相同的介面),更大增加了彈性,這就是 Strategy Pattern

參考資料
  1. Inheritance versus composition: Which one should you choose?
  2. Android Game Development - Design In-game Entities - The Strategy Pattern

... ...

8/16/2011

[DP] Dependency Inversion Principle 依賴倒轉原則

1. 高階模組不應該依賴低階模組,兩者都應該依賴抽象

2. 抽象不依賴實作細節,實作細節依賴抽象

幾個網路上的文章說明的蠻清楚的,在這邊筆記一下!

  1. 控制反轉(Inversion of Control)介紹 | Java頻道

  2. Dependency Inversion Principle | Object Oriented Design

  3. What is Dependency Inversion? Is it IoC? – Java Code Geeks

— EOF —

7/29/2011

[Java] Access Modifier in Java and C++

物件導向主要精神之一就是封裝,於是牽涉到了 "public", "protected", "private" 這些存取權限控制的關鍵字。和 C++ 相比 ,Java 當中又多了 package scope 的概念。

C++ 的 namespace 和 Java 的 package 有什麼不一樣呢?我的理解是,namespace 只是將一群 class 打包起來,並不涉及 classes 彼此之間的存取權限;但是 package 在 Java 當中是預設的 scope,如果你不為 class member 指定 access modifier 的話,預設就是 package 存取權限 (即在相同 package 之內的所有 classes 都可以存取該成員)

今天在聽同事介紹 Java 繼承的時候,讓我產生了一些困惑。

在 C++ 當中使用繼承時,會在父類別前面加上一個 access modifier,這個 access modifier 定義了父類成員繼承至子類時,所能對外被存取的最大權限 (父類的 public 成員如果用 protected 繼承給子類,那麼子類從父類那邊得到的該成員對外被存取的最大權限就降至 protected)

但是 Java 當中的繼承似乎沒有 access modifier 這件事,就是單純的使用 extends。更令我驚奇的是,父類成員的存取權限到了子類當中竟然還可以變得更開放 (這不是跟 C++ 相反?)

請看以下頭的程式碼中,Base class 有四個不同存取權限的 method,繼承到 Derived 後,凡是將存取權限放寬者皆 OK,將存取權限降低者皆編譯不過。:


這不禁讓我想到,Java 有這種針對各個成員函式調變對外存取權限的能力,而 C++ 卻只能用 access modifier 定一個最高門檻?於是,Google 了一下竟發現,如果你是用 protected/private 繼承的話,是有辦法把部分因 access modifier 降級的成員函式提昇至 public 的,請看以下程式碼:


在 Test::test() 函式當中可以看到,Derived1 類是用 protected 繼承 Base (改成 private 也可),所以對外是無法存取他的成員的,但是 Derived2 類利用 Base:: 的方式讓因 protected 繼承而改變存取權限的成員,又成為 public 了。那會想說,可不可以連同把 Base 類當中的 private 成員也變成 public,可以看到在 Derived2 類當中的嘗試,是不行的!

雖然經過實驗大概比較清楚 C++ 和 Java 繼承對於成員物件的影響,但是我依舊不明白,C++ 越繼承對外權限越小,而 Java 越繼承對外權限越大,這兩個相反的設計思考是怎麼樣的考量?

石頭的回答:
這個我直覺的認為是基本上 C++ 跟 Java 的 objec​t model 的差異。在 C++ 中如果父類別的 public method 被子類別改成 private,client​ 只要轉型成父類別就可以操作 method。在 Java 中所有繼承都是虛擬繼承。

關於 C++ Namespace 和 Java Package 的討論可以參考:
1. C++ Namespaces, comparison to Java packages | Stack Overflow
2. Java packages vs. C++ libraries | Stack Overflow

關於 C++ access modifier 可以參考:
1. inheritance - C++ subclassing access modifier? | Stack Overflow
2. Inheritance: private and protected inheritance

關於 Java 類別成員存取權限可以參考:
1. Controlling Access to Members of a Class

7/06/2011

[Note] Android 使用者介面設計競賽之賽前聚會 筆記

SPB Software

這家公司主力產品是一個 UI 的 3d Engine,一款產品叫做 SPB Shell 3D ($14.99),研發總部在俄羅斯

UI Element

  1. Speed
  2. User Friendly
  3. Stability
  4. WOW

End User Viewpoint

  1. Fancy
  2. Fully Customized
  3. Full Functions
  4. Free

Branding Viewpoint

  1. Engine (3D Engine)
  2. SDK
  3. Customized Version
  4. Something Different

ODM Requirement (SPB UI Builder)

  1. Customized Tool
  2. Different Model
  3. Cross Platform
  4. Low Cost

遠傳 Roger Chen

  1. Art is about expression, not UI, UI or UE
  2. Design is about achieve goals and resolve problems
  3. Designe (User Interface and User Interaction) for User Experience
  4. 根據用戶的興趣、需求和「動機」提出「原創」且「巧妙」的回應,就是設計!
  5. 對於可利用的「裝置」進行盤點,每個裝置都可以「行為」的思考模式跳脫裝置外在的用途,例如 (吹 -> 麥克風)
  6. 音效很重要,配樂則讓用戶想像一個情境/舞台
  7. 互動的兩個層次: 1. 故事性 2. 物理性

勤崴

UI 設計的一些 guidelines
  1. 系統狀態的可視性
  2. 系統和現實的相似性
  3. 使用者控制和自由度
  4. 一致性/標準化
  5. 避免錯誤
  6. 辨識而非記憶
  7. 彈性以及使用的效率
  8. 從錯誤中復原

工研院(莊國煜)

Open GeoSMS SDK 介紹:一個簡單的地理位置交換 protocol,以簡訊的方式傳遞,可以跨平台各種手機通用!

... ...

6/29/2011

[C++] 使用預設參數值 實現 可變量參數

#include <iostream>
using namespace std;

void method(int a, int b) {
 int aa = a;
 int bb = b;
 cout << "aa:" << aa << " bb:" << bb << endl;
}

void defaultParaMethod(int a = 0, int b = 1) {
 int aa = a;
 int bb = b;
 cout << "aa:" << aa << " bb:" << bb << endl;
}

int main() {

 int A = 1;
 int B = 2;
 defaultParaMethod(A);
 defaultParaMethod(A, B);
 //method(a); // error

 return 0;
}

6/28/2011

[Android] 執行週期性任務 - execute period task

最近專案需要定期從系統擷取一些資料,除了開一個 thread 之外,找的一個更為輕量的解決方案,整理如下:

final Handler handler= new Handler();
        
final int delay = 5000; // 5 second
final int period = 1000; // 1 second

final Runnable r = new Runnable() {
    public void run() {
        Toast.makeText(getApplicationContext(),"RUN!",Toast.LENGTH_SHORT).show();
        handler.postDelayed(this, period);
        }
    };

handler.postDelayed(r, delay);

poseDelayed(): adds the runnable to the queue and it runs in the UI thread

除了這個方法之外還有一些其他的方法:
1. Handlers, and PostDelayed can be nice lightweight ways of having your foreground activity called on a regular basis. Even the messages are reused. These are used in the Snake example program (Snake/SnakeView.java/sleep()) to make the snake move. It runs as 'post a message delayed by 500ms', in 500ms catch it in HandleMessage (the default for Handlers), move, then send it again. Even the message is reused with obtainMessage(). I've used these for making a button update while it is pushed down.

2. Threads are a bit heavier. You might use these for background or where you are already used to running a thread. Make a 'new Thread(aRunnable).start()'. I haven't used them much on the Android.

3. Launch an Intent with StartActivityForResult() and catch the result with OnActivityResult to make a standard RPC. See step 2 of the notepad example for more information.

4. Look into more Intents to launch for different scenarios. I find putting your 'create and launch intent' into separate functions helps maintenance and debugging.

via Android - Question on postDelayed and Threads

參考資料:
  1. 「有人建議不要使用 TimerTasks」: Schedule task in android - Stack Overflow
  2. How to run a Runnable thread in Android? - Stack Overflow

... ...

6/26/2011

[C++] local variable 為什麼可以離開 scope 而被存取

在 stackoverflow 看到一則有趣的討論串,問題是這樣的:

int * foo()
{
    int a = 5;
    return &a;
}

int main()
{
    int* p = foo();
    cout << *p;
    *p = 8;
    cout << *p;
}

And the code is just running with no runtime exceptions! The output was 5 8! How can it be? Isn't the memory of a local variable inaccessible outside its function?

意思就是為什麼 a 這個函數的局部變數還存活到離開了函數的 scope 呢?下面一個答案的比喻真是妙極了:
You rent a hotel room. You put a book in the top drawer of the bedside table and go to sleep. You check out the next morning, but "forget" to give back your key. You steal the key!

A week later, you return to the hotel, do not check in, sneak into your old room with your stolen key, and look in the drawer. Your book is still there. Astonishing!

How can that be? Isn't the contents of a hotel room drawer inaccessible if you haven't rented the room?

這個作者回答的相當生動,當然後面也補充了一些技術細節,有興趣的可以到這裡參考!

參考文章


... ...

6/22/2011

[Eclipse] 調整 Eclipse 在 Mac 中選單字體大小

在 Mac 環境中運行 Eclipse 字體變得很小,Editor 的字體大小可以透過 Preference 選項修改,那選單裡面的字型要怎麼放大呢?

可以參考 Make Eclipse use larger fonts 這篇文章。主要就是到 Eclipse 的安裝路徑下找到 eclipse.ini 這個檔案,然後把裡面的 -Dorg.eclipse.swt.internal.carbon.smallFonts 改成 -Dorg.eclipse.swt.internal.carbon.largeFonts 即可。

要怎麼找到 eclipse.ini 這個檔案呢?在 Eclipse.app 上面按右鍵 Show Package Contents -> Contents -> MacOS -> eclipse.ini 即可...

... ...

[C++] 淺談左值與右值 - lvalue and rvalue

左值和右值感覺是基礎的東西,書本上經常會提到,但是始終不懂他們的用意是什麼,又有什麼區別,於是決心到網路上找看看有沒有精確又容易理解的說明!發現「Rvalue References: C++0x Features in VC10, Part 2」講解的還不錯,節錄如下:

lvalues and rvalues in C++98/03

C++03 3.10/1 says: "Every expression is either an lvalue or an rvalue."  It's important to remember that lvalueness versus rvalueness is a property of expressions, not of objects

原來 lvalue 和 rvalue 是用來描述 「expressions」 的屬性而非 objects!

Lvalues name objects that persist beyond a single expression.  For example, obj , *ptr , ptr[index] , and ++x are all lvalues.

Rvalues are temporaries that evaporate at the end of the full-expression in which they live ("at the semicolon").  For example, 1729 , x + y , std::string("meow") , and x++ are all rvalues.

左值讓一段 expression 成為一個有名稱的物件;而右值只是一段 expression 的結果且隨時會蒸發不見。為什麼 ++x 是左值而 x++ 卻是右值呢?

Both ++x and x++ increment x, but ++x returns the persistent object itself, while x++ returns a temporary copy. That's why ++x is an lvalue, while x++ is an rvalue

If you want to build up intuition for this, another way to determine whether an expression is an lvalue is to ask "can I take its address?". If you can, it's an lvalue. If you can't, it's an rvalue. For example, &obj , &*ptr , &ptr[index] , and &++x are all valid (even though some of those expressions are silly), while &1729 , &(x + y) , &std::string("meow") , and &x++ are all invalid.

並且可以利用一個簡單的方法來 check 一段 expression 是 lvalue 或 rvalue,就是看看可不可以使用 & 運算元對該 expression 取得他的位置

"A function call is an lvalue if and only if the result type is a reference." (C++03 5.2.2/10) Therefore, given vector v(10, 1729); , v[0] is an lvalue because operator[]() returns int& (and &v[0] is valid and useful), while given string s("foo"); and string t("bar"); , s + t is an rvalue because operator+() returns string (and &(s + t) is invalid)

Both lvalues and rvalues can be either modifiable (non-const) or non-modifiable (const). Here are examples:

左值和右值皆可以為 non-const 和 const (用 non-const 似乎較 modifiable 來的直覺),以下為範例:

string one("cute");
const string two("fluffy");
string three() { return "kittens"; }
const string four() { return "are an essential part of a healthy diet"; }

one; // modifiable lvalue
two; // const lvalue
three(); // modifiable rvalue
four(); // const rvalue

Type& binds to modifiable lvalues (and can be used to observe and mutate them). It can't bind to const lvalues, as that would violate const correctness. It can't bind to modifiable rvalues, as that would be extremely dangerous. Accidentally modifying temporaries, only to have the temporaries evaporate along with your modifications, would lead to subtle and obnoxious bugs, so C++ rightly prohibits this. And it can't bind to const rvalues, as that would be doubly bad. (Careful readers should note that I'm not talking about template argument deduction here.)

non-const reference 可以綁定 non-const lvalues,不可以綁定 const lvalues。這很容易理解,因為 reference 就只是一個 alias。

non-const reference 也不能綁定 non-const rvalue。因為 rvalue 只是一個暫態,沒有一個東西可以 hold 住他,所以你可能以為 non-const reference 可以對他做操控,但實際上卻不行。


const Type& binds to everything: modifiable lvalues, const lvalues, modifiable rvalues, and const rvalues (and can be used to observe them).

const reference 則可以綁定所有 (non-const lvalues, const lvalues, non-const rvalues 和 const rvalues)


接著還可以進一步牽扯到 C++0x 的新語言特性,有點複雜,因此有興趣的話可以再回原文參閱...


參考資料:
Rvalue References: C++0x Features in VC10, Part 2
http://blogs.msdn.com/b/vcblog/archive/2009/02/03/rvalue-references-c-0x-features-in-vc10-part-2.aspx

C++ Primer 中文版 p.60

... ...

6/20/2011

[C++] 搞懂複雜變數的簡單規則 - Right-Left Rule

雖然平常寫程式的時候不太會用到那麼複雜的變數,但是這東西考試倒是蠻喜歡考的,靠著 Right-Left Rule 在複雜的變數也可以被輕鬆破解!

底下為轉文,原文在 C Right-Left Rule (Rick Ord's CSE 30 - UC San Diego)

The "right-left" rule is a completely regular rule for deciphering C
declarations.  It can also be useful in creating them.

First, symbols.  Read

     *  as "pointer to"   - always on the left side
     []  as "array of"   - always on the right side
     ()  as "function returning"  - always on the right side

as you encounter them in the declaration.

STEP 1
------
Find the identifier.  This is your starting point.  Then say to yourself,
"identifier is."  You've started your declaration.

STEP 2
------
Look at the symbols on the right of the identifier.  If, say, you find "()"
there, then you know that this is the declaration for a function.  So you
would then have "identifier is function returning".  Or if you found a 
"[]" there, you would say "identifier is array of".  Continue right until
you run out of symbols *OR* hit a *right* parenthesis ")".  (If you hit a 
left parenthesis, that's the beginning of a () symbol, even if there
is stuff in between the parentheses.  More on that below.)

STEP 3
------
Look at the symbols to the left of the identifier.  If it is not one of our
symbols above (say, something like "int"), just say it.  Otherwise, translate
it into English using that table above.  Keep going left until you run out of
symbols *OR* hit a *left* parenthesis "(".  

Now repeat steps 2 and 3 until you've formed your declaration.  Here are some
examples:

     int *p[];

1) Find identifier.          int *p[];
                                  ^
   "p is"

2) Move right until out of symbols or left parenthesis hit.
                             int *p[];
                                   ^^
   "p is array of"

3) Can't move right anymore (out of symbols), so move left and find:
                             int *p[];
                                 ^
   "p is array of pointer to"

4) Keep going left and find:
                             int *p[];
                             ^^^
   "p is array of pointer to int". 
   (or "p is an array where each element is of type pointer to int")

Another example:

   int *(*func())();

1) Find the identifier.      int *(*func())();
                                    ^^^^
   "func is"

2) Move right.               int *(*func())();
                                        ^^
   "func is function returning"

3) Can't move right anymore because of the right parenthesis, so move left.
                             int *(*func())();
                                   ^
   "func is function returning pointer to"

4) Can't move left anymore because of the left parenthesis, so keep going
   right.                    int *(*func())();
                                           ^^
   "func is function returning pointer to function returning"

5) Can't move right anymore because we're out of symbols, so go left.
                             int *(*func())();
                                 ^
   "func is function returning pointer to function returning pointer to"

6) And finally, keep going left, because there's nothing left on the right.
                             int *(*func())();
                             ^^^
   "func is function returning pointer to function returning pointer to int".


As you can see, this rule can be quite useful.  You can also use it to
sanity check yourself while you are creating declarations, and to give
you a hint about where to put the next symbol and whether parentheses
are required.

Some declarations look much more complicated than they are due to array
sizes and argument lists in prototype form.  If you see "[3]", that's
read as "array (size 3) of...".  If you see "(char *,int)" that's read
as "function expecting (char *,int) and returning...".  Here's a fun
one:

                 int (*(*fun_one)(char *,double))[9][20];

I won't go through each of the steps to decipher this one.

Ok.  It's:

     "fun_one is pointer to function expecting (char *,double) and 
      returning pointer to array (size 9) of array (size 20) of int."

As you can see, it's not as complicated if you get rid of the array sizes
and argument lists:

     int (*(*fun_one)())[][];

You can decipher it that way, and then put in the array sizes and argument
lists later.

Some final words:

It is quite possible to make illegal declarations using this rule,
so some knowledge of what's legal in C is necessary.  For instance,
if the above had been:

     int *((*fun_one)())[][];

it would have been "fun_one is pointer to function returning array of array of
                                          ^^^^^^^^^^^^^^^^^^^^^^^^
pointer to int".  Since a function cannot return an array, but only a 
pointer to an array, that declaration is illegal.


Illegal combinations include:

  []() - cannot have an array of functions
  ()() - cannot have a function that returns a function
  ()[] - cannot have a function that returns an array

In all the above cases, you would need a set of parens to bind a *
symbol on the left between these () and [] right-side symbols in order
for the declaration to be legal.

Here are some legal and illegal examples:

int i;                  an int
int *p;                 an int pointer (ptr to an int)
int a[];                an array of ints
int f();                a function returning an int
int **pp;               a pointer to an int pointer (ptr to a ptr to an int)
int (*pa)[];            a pointer to an array of ints
int (*pf)();            a pointer to a function returning an int
int *ap[];              an array of int pointers (array of ptrs to ints)
int aa[][];             an array of arrays of ints
int af[]();             an array of functions returning an int (ILLEGAL)
int *fp();              a function returning an int pointer
int fa()[];             a function returning an array of ints (ILLEGAL)
int ff()();             a function returning a function returning an int
                                (ILLEGAL)
int ***ppp;             a pointer to a pointer to an int pointer
int (**ppa)[];          a pointer to a pointer to an array of ints
int (**ppf)();          a pointer to a pointer to a function returning an int
int *(*pap)[];          a pointer to an array of int pointers
int (*paa)[][];         a pointer to an array of arrays of ints
int (*paf)[]();         a pointer to a an array of functions returning an int
                                (ILLEGAL)
int *(*pfp)();          a pointer to a function returning an int pointer
int (*pfa)()[];         a pointer to a function returning an array of ints
                                (ILLEGAL)
int (*pff)()();         a pointer to a function returning a function
                                returning an int (ILLEGAL)
int **app[];            an array of pointers to int pointers
int (*apa[])[];         an array of pointers to arrays of ints
int (*apf[])();         an array of pointers to functions returning an int
int *aap[][];           an array of arrays of int pointers
int aaa[][][];          an array of arrays of arrays of ints
int aaf[][]();          an array of arrays of functions returning an int
                                (ILLEGAL)
int *afp[]();           an array of functions returning int pointers (ILLEGAL)
int afa[]()[];          an array of functions returning an array of ints
                                (ILLEGAL)
int aff[]()();          an array of functions returning functions
                                returning an int (ILLEGAL)
int **fpp();            a function returning a pointer to an int pointer
int (*fpa())[];         a function returning a pointer to an array of ints
int (*fpf())();         a function returning a pointer to a function
                                returning an int
int *fap()[];           a function returning an array of int pointers (ILLEGAL)
int faa()[][];          a function returning an array of arrays of ints
                                (ILLEGAL)
int faf()[]();          a function returning an array of functions
                                returning an int (ILLEGAL)
int *ffp()();           a function returning a function
                                returning an int pointer (ILLEGAL)


... ...

6/17/2011

[Java] 淺談 call by value 和 call by reference

在 C++ 中, call-by-value 意味著把變數的值複製一份傳進函數;  而 call-by-reference 則意味著把變數的 alias (用 &var 或者指標) 傳進函數當中。

因此,在 C++ 中我是這麼理解的,在函數內部改變 call-by-value 傳入的參數並不會影響外部變數,因為傳進來的是它的複製品;  而改變 call-by-reference 傳入的參數則會影響到外部變數,因為 alias 是指向同一個 value 的。

基於這樣的理解,在學習 Java 的時候遇到「只有 call-by-value」這樣的觀念,便在讓我產生了疑惑:「要怎麼讓傳入函數的變數隨著函數內部對它操作而跟著變動」,也就是說 Java 要怎麼做到 call-by-reference 的語意呢?

後來發現,原本我以為 Java 的 call-by-value 和 C++ 的 call-by-value 有相同的立足點 (將物件複製一份丟進函數) 實際上是錯誤的。

原來,在 Java 當中,除了原生型別的變數,一般型別的變數其實不是直接 hold 物件本身,而是 hold 物件的 reference!

這點跟 C++ 就有一點出入了,在 C++ 中要用一個變數 hold 一個物件的 reference,只得明確用指標,像是 Dog* aDog = new Dog;  這樣一來,操作上也得用 -> 運算子,像是 aDog->setName('Lucky');  如果是用 Dog aDog;aDog 這個變數就是指物件本身(傳進函數會被複製一份)。

Java 沒有指標的觀念 (全物件導向),除了原生型別,它的物件都需要用 new 建立 (跟 C++ 的 new 又不太一樣,C++ new 是用來動態配置記憶體用的)  如 Dog aDog = new Dog;  這裡的 aDog 並不是 Dog 型別的物件本身,而是物件的一個 reference

因此「要怎麼讓傳入函數的變數隨著函數內部對它操作而跟著變動」這個疑惑就解開了,Java 所謂的「只有 call-by-value」的 value 指的就是「物件的 reference」,既然物件的 reference 被複製一份進去函數,那當然可以透過函數內部操作該 reference 來改變外部的物件 (而且不需要用 -> 運算元)。

這裡又冒出一個問題,既然原生型別的物件在 Java 當中是直接 hold 物件的值,所以傳入函數參數的預設行為就是 call-by-value,那麼如果想要實現 call-by-reference 的語意該怎麼做呢?其實也很簡單,就是將該原生型別的變數包裝成一個陣列,再傳入函數即可。

public static void increment(int[] array, int amount)
{
   array[0] = array[0] + amount;
}

public static void main(String args[])
{
   int[] myInt = { 1 };

   increment (myInt, 5);

   System.out.println ("Array contents : " + myInt[0]);
}

參考資料:
Java is Pass-by-Value, Dammit! - Scott Stanchfield
http://javadude.com/articles/passbyvalue.htm

Q&A : How do I pass a primitive data type by reference?
http://www.javacoffeebreak.com/faq/faq0066.html

... ...

6/14/2011

[Android] Thread, Looper, Handler and MessageQueue

目標:

Handler, Message, MessageQueue, Looper 它們四個 class 只有一個共同的目標
就是讓程式碼,可以丟到其它 thread 去執行。這麼作有什麼好處呢 ??

Android 的 GUI 元件不是 thread safe的 (屬單線程模型,Android UI 操作並不是線程安全的,並且這些操作必須在 UI線程 中執行,無法 multi-thread 執行)。

Activity 的畫面顯示是由 UI Thread 所負責的,若是你寫了 mutlti-thread 程式,又想更新畫面,就必須要將 Thread 內部的一段程式碼,交由 UI Thread 來執行才行。

類別說明:

Handler:
提供 callback function,預期讓其它 Thread 執行!
但 Handler 又要如何 transfer 至其它 Thread 呢? 於是有了 Message!

Message:
將 Handler 包裝起來, 傳送給其它 Thread!
但是同時有多條 thread 不斷的在系統中傳遞 Message 那麼如何緩衝呢?

MessageQueue:
是為了讓 Message 能夠作緩衝,好讓 Message 先暫存起來。
因此,當 Message 已經被放在其它 Thread 上的 MessageQueue 之後, 它裡面包著 Handler, 而 Handler 上的 callback function 總得有人來執行吧?

Looper:
就是為了將 Message 由 Thread 所對應的 MessageQueue 取出來,並且拿出 Handler
來執行它上面的 callback function.

當 Looper.java 中的 loop() 被呼叫起來之後,它就是在反覆作這件事
不斷將 Handler 由 Message 取出來,並且執行 Handler 上的 callback function。


Attribute to - [Android 개발] Looper와 Handler

這裡可以參考兩個網路文章的範例:

1. Detecting Network Speed and Type on Android (Edge,3G) | Greg's Dev Blog

  • 這個範例當中展示了,override Handler 物件 (此 handler 綁定 UI thread) 當中的 handleMessage 方法,對 MessageQueue 當中不同的 message 作處理 (利用 switch case 判斷message 更新 UI)。
  • 宣告了一個 Runnable 物件,並在 button 按下去的時候開啟一個新的 thread (以該 Runnable 物件初始化該 thread) 執行下載的任務,注意,在下載任務執行的代碼中,利用 mHandler.sendMessage() 將 message 傳入 UI thread 的 MessageQueue 當中進行 UI 更新。

2. Android Guts: Intro to Loopers and Handlers | Mind The Robot

  • 不同上面的範例,此範例將 Download 寫成一個獨立的 class (DownloadThread.java) 繼承 Thread,並且覆寫 run 函式,在其中實現 Looper 機制,負責處理 MessageQueue 中的任務 (範例中只是用一個計時器模擬下載任務)。
  • 而 DownloadQueueActivity 這個主要的 UI thread 包含一個 DownloadThread 成員,並且實現了 DownloadThreadListener 介面。在建構式中,將自己指定為 DownloadThread 成員的 Listener。由此,DownloadThread 可以調用 handleDownloadThreadUpdate 這個介面函式,讓 UI thread 做更新。反向來看,點擊 DownloadQueueActivity 當中的按鈕,則可以向 DownloadThread 的 MessageQueue 添加任務 (利用 enqueueDownload 函式)。

若想要更進一步瞭解細節可以依序參考下面的資料!


參考資料:

清楚瞭解 android.os 源碼中的 Looper,Handler,Message,MessageQueue | Milochen's Blog for hacking
http://milochen.wordpress.com/2011/03/25/understanding-android-os-src-looperhandler-message-messagequeue/

Android Guts: Intro to Loopers and Handlers | Mind The Robot
http://mindtherobot.com/blog/159/android-guts-intro-to-loopers-and-handlers/

Handler, Looper, Thread | Eddy@Joomla!藏經閣
http://blog.joomla.org.tw/android/173-Handler-Looper-Thread.html

Android 講義摘錄 | Google Android 論壇
http://www.android1.net/Topic.aspx?BoardID=11&TopicID=294

Android的線程使用來更新UI - Thread、Handler、Looper、TimerTask 等 | 山嶺巨人
http://www.cnblogs.com/playing/archive/2011/03/24/1993583.html

Android – Thread Messaging | DK's Blog
http://codinghard.wordpress.com/2009/05/16/android-thread-messaging/


... ...

6/10/2011

[Android] SharedPreferences - a example of application components share "SharedPreferences" Data


此範例展示如何利用 SharedPreferences 作為 application components 交換資料的方式。並且在程式起始的時候讀取 SharedPreferences 的內容,並有一清除 SharedPreferences 的按鈕。

Download source

參考資料:

Data Storage | Android Developers
http://developer.android.com/guide/topics/data/data-storage.html

Android數據存取之Preferences
http://www.roiding.com/index.php/archives/72

... ...

[Android] AsyncTask - a file downloading example with progress bar


Android single-threaded model:
1. Do not block the UI thread, and
2. Make sure that you access the Android UI toolkit only on the UI thread.

AsyncTask just makes it easier to do both of these things.

This example implement a AsyncTask downloader with a progress bar, Enjoy it :)
Download source

參考資料:

Painless Threading | Android Developers
http://developer.android.com/resources/articles/painless-threading.html

How to Use AsyncTask for Android
http://www.brighthub.com/mobile/google-android/articles/82805.aspx

AsyncTask | Android Developers
http://developer.android.com/reference/android/os/AsyncTask.html

... ...

6/02/2011

[C++] Reference 和 Pointer 的差異

在 C++ 當中 Reference 和 Pointer 都是一種間接取值的方法,既然兩者的功能那麼相近,到底為什麼要有 Reference 的存在呢?針對找到的資訊作一些整理如下:

  • Reference 和 Pointer 在功能和使用上的差異
  1. A pointer can be re-assigned any number of times while a reference can not be reassigned after initialization
  2. A pointer can point to NULL while reference can never point to NULL
  3. You can't take the address of a reference like you can with pointers
  4. There's no "reference arithmetics" (but you can take the address of an object pointed by a reference and do pointer arithmetics on it as in &obj + 5)

C++ 標準並沒有規定 compiler 要怎麼實作 Reference,但是似乎背後還是用指標的方式實現,所以在效能上並無差異。

  • Reference 的存在意義
  1. I believe the key insight into why C++ has reference types as well as pointer types is that reference types enable overloaded operators to look like built-in operators, as well as act like them.
  2. Pointers can do almost everything that references can do, but they can lead to expressions that don't look right. On the other hand, references have some restrictions that make them less convenient than pointers for implementing algorithms and data structures. References reduce, but do not eliminate, the need for pointers.
  3. As a general rule, use references in function parameters and return types to define attractive interfaces. Use pointers to implement algorithms and data structures.

參考資料:

5/17/2011

[Android] Tab Layout 的兩種實做方式 - TabWidget


Tab Layout 是一種適合將不同類型 View 作為顯示區隔的一種設計模式,這篇紀錄兩種實做的方式。按照 Android 官方範例說到,實現 Tab Layout 有兩種選擇:

1. Use the tabs to swap views within the same activity (使用單一activity去切換不同的views)
2. Use the tabs to change between entirely separate activities (用tabs切換多個activities)

以下附上我實驗出來的專案檔:

1. TabLayout_ViewSwap
2. TabLayout_Activities

參考資料:
1. http://developer.android.com/resources/tutorials/views/hello-tabwidget.html
2. http://developer.android.com/guide/topics/resources/drawable-resource.html#StateList
3. http://mobileorchard.com/android-app-development-tabbed-activities/
4. http://stackoverflow.com/questions/1590340/android-tabs-mapview-activities-within-tabs/3695817#3695817

... ...

[Android] PAAD Ch5 筆記

[Android] PAAD Ch4 筆記

[Android] PAAD Ch3 筆記

4/26/2011

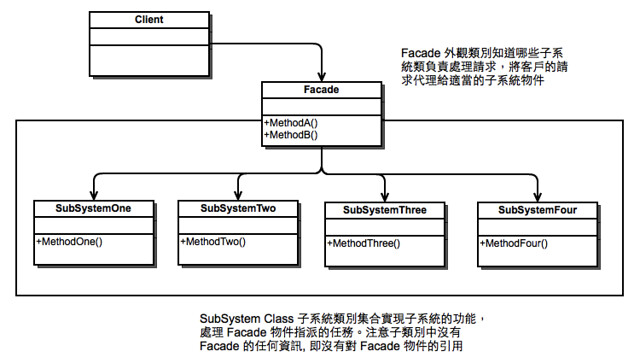
[DP] Facade 外觀模式


外觀模式 (Facade): 為子系統中的一組介面提供一個一致的介面,此模式定義了一個高層介面,這個介面使得這一個子系統更加容易使用。

開發過程三階段的外觀模式考量:

1. 設計初期,在三層架構 (MVC) 中,在 資料存去層和業務邏輯層 以及 業務邏輯層和表示層 之間建立外觀模式,為複雜的子系統提供一個簡單的介面。

2. 開發過程中,子系統會變得越來越複雜,產生越來越多的類別,這些類別彼此互相依賴,外部調用十月來越加困難,這時可以加入 Facade 提供一個簡單介面。

3. 維護一個遺留的大型系統,但其已經非常難以維護和擴展。但是開發又必須要依賴於它。可以為新系統開發一個 Facade 類別,把高度複雜的遺留程式包裝成較清晰簡單的介面,讓新系統和 Facade 物件互動,Facade 則與所有遺留程式互動。

參考資料:大話設計模式

... ...

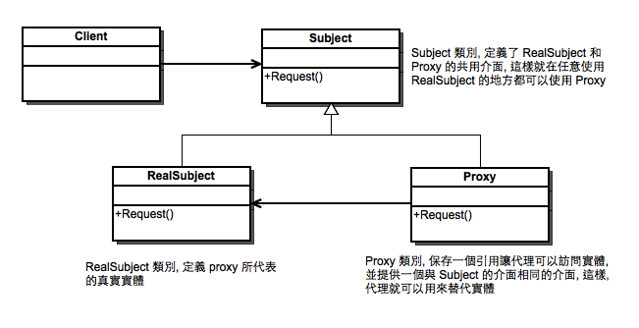
[DP] Proxy 代理模式


代理模式(Proxy): 為其他物件提供一種代理以控制對這個物件的存取。在存取物件時引入一定程度的間接性,因為這種間接性,可以附加多種用途

應用場合:

1. 遠端代理:為一個物件在不同的位址空間提供局部代表。這樣可以隱藏一個物件存在於不同位址空間的事實。

2. 虛擬代理:根據需要建立消耗很大的物件。透過他來存放實體化需要很長時間的真實物件。

3. 安全代理:用來控制真實物件存取時的許可權。

4. 智慧參考:調用真實的物件時,代理處理另外一些事。


參考資料:大話設計模式

... ...

4/18/2011

[iOS] 在 UITabBarController 中放置 UINavigationController

1. 建立一個 Window-based application
2. 在 AppDelegate .h 檔中宣告一個 UITabBarController property
3. 在 AppDelegate .m 當中 [self.window addSubview: [tabBarController view],記得 synthesize 和 release properties
4. 打開 MainWindow.xib 從 Library 拉一個 TabbarController 進來
5. 選取 MainWindow.xib 當中的 AppDelegate 將 UITabBarController property 和 剛剛拉進去的 TabbarController 連結起來
6. 點選 MainWindow.xib 當中的 TabbarController,打開 inspector 將其中一個 tab 的 view controller class 設定成 Navigation Controller
7. 加入新的 ViewController files (不含 xib) 並將繼承改為 UINavigationController
8. 在 AppDelegate .h 檔中宣告一個 第7步 ViewController 的 property,並在 .m 檔中 synthesize 和 release
9. 加入新的 ViewController files (含 xib) 作為 NavigationController 的 rootViewController
10. 將 MainWindow.xib 當中 TabbarController 裡頭的 Navigation Controller 的 class 設成 第7步 加進來的 View Controller
11. 將 MainWindow.xib 當中 TabbarController 裡頭的 Navigation Controller 裡頭的 View Controller 設成 第8步 加進來的 View Controller

參考資料:iPhone 軟體開發筆記: 產生含有 Navigation controller 的 Tab bar controller

... ...

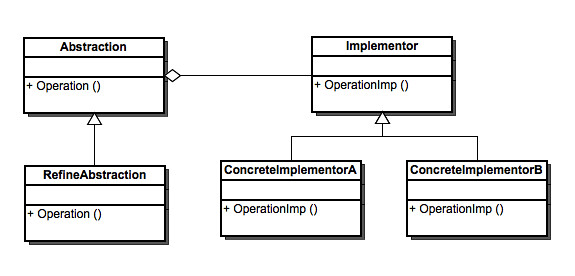
[DP] Bridge 橋接模式


橋接模式(Bridge):將 抽象部分它的實現部分 分離,使他們都可以獨立的變化。

實現系統可能有多角度的分類 (如果用繼承來思考,可能拿哪一種角度當做父類別都不恰當),而每一種分類都有可能發生變化,那麼就把這種多角度分離開來,讓它們獨自變化,減少它們之間的耦合。

當我們發現需要多角度去分類實現物件時,只用繼承會造成大量的類別增加,不能滿足開放-封閉原則時,就應該要考慮使用橋接模式。

選擇一個角度當做抽象部分,另外一個角度則以 抽象實現 聚合進 你選定的主抽象部分,兩者都可以隨變化應變

物件的繼承關係是在編譯時就已經定義好了,所以無法在執行時改變父類別繼承的實現。子類別的實現與其父類別有非常緊密的依賴關係,以至於父類別實現中的任何變化必然會導致子類別發生變化。當需要複用子類別時,如果繼承下來的實現不適合解決新的問題,則父類別必須重寫或被其他更適合的類別替換。這種依賴關係限制了靈活性,也限制了複用性。

合成/聚合 複用原則:儘量使用 合成/聚合,儘量不要使用類別繼承。使用繼承時,一定要在是 is-a 的關係之下才用,而不是任何時候都用。

參考:
1. 大話設計模式
2. http://www.jdon.com/designpatterns/bridge.htm

... ...

[DP] Singleton 獨體模式


獨體模式(Singleton):保證一個類別僅有一個實體,並提供一個存取它的全域訪問點。

「可以使用一個總體變數使得一個物件被存取 (1),但它不能防止你實體化多個物件。一個最好的辦法就是,讓類別自身負責保存它的唯一實體。這個類別可以保證沒有其他的實體被建立,並提供一個存取該實體的方法 (2)」

(1) 在用戶端,事先宣告一個變數,檢查其是否為 null,如果為 null 才 create,非 null 則不動作。
缺點:此時考慮該物件實體化的問題落在用戶端身上

(2) 宣告一個 static 的自身(Singleton) 變數,並且將建構式私有化 (private constructor),然後一個 static 的方法 GetInstance() 存取唯一的自身變數。GetInstance() 當中的實現會去檢查自身變數是否已經被建立,「否」則建立返回,「是」則單純返回。

優點:用戶端不再考慮使否需要去實體化的問題,而把責任都給了應該負責的類別去處理

注意事項:多執行緒同時存取 Singleton 類別,調用 GetInstance() 方法,會有可能造成建立多個實體。這時必須給行程 lock 來處理。lock 是確保一個執行緒位於程式碼臨界區時,另一個執行緒不進入臨界區。如果其他執行緒試圖進入鎖定的程式碼,則它將一直等待 (即被阻止),直到該物件被釋放。

參考:大話設計模式。

... ...

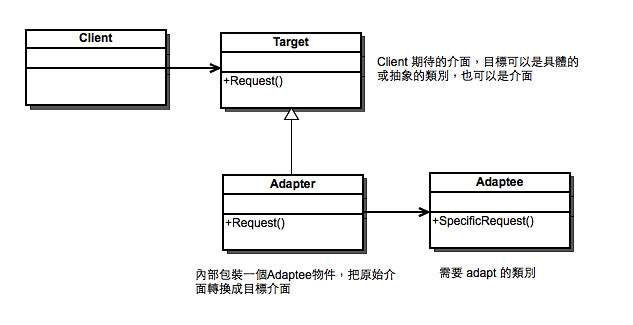
[DP] Adapter 轉接器模式


轉接器模式(Adapter):將一個類別的介面轉換成客戶希望的另一個介面。Adapter 模式使得原本由於介面不相容而不能一起工作的類別可以一起工作

轉接器模式主要應用於希望複用一些既有的類別,但是介面又與複用環境要求不一致的情況。

Adapter 繼承 Target 於是繼承了客戶需求的介面 (Request 方法),然後在 Adapter 當中包含一個 Adaptee 物件,把 Adapter 的 Request 方法實現為去呼叫 Adaptee 當中的 SpecificRequest 方法,達成轉接之目的。

是軟體就有維護的一天,維護就有可能因不同的開發人員、不同的產品、不同的廠商而造成功能類似而介面不同的情況,此時便是使用轉接器模式的時候。

類別汗方法的命名應該有規範,最好是前期就設計好,介面不相同時,首先不應該考慮使用轉接器,而是應該考慮透過重構統一介面

參考資料:大話設計模式。

... ...

4/15/2011

[RD] 如何使用 libSVM

以下紀錄使用 libsvm 的簡易方法:

注意:假設有 N 類要作 trainning,train_data 的 feature 排列的前 N 個需要由 0 ~ (N-1) 順序排列

  1. 針對訓鍊資料作 scaling, 並且產生 scale 檔案 scale_para

     svm-scale -s scale_para train_data > train_data.scale
    
  2. 利用 scale_para 針對測試資料作 scaling

     svm-scale -r scale_para test_data > test_data.scale
    
  3. 找出較佳的 -c 和 -g 參數給 svm-train

     grid.py train_data.scale
    
  4. 產生一個 model 檔案

     svm-train -c 2.0 -g 0.03125 -t 2 -b 1 train_data.scale (train_data.scale.model will be generated)
    
  5. 運用該 model 檔案針對測試資料作預測

     svm-predict -b 1 test_data.scale train_data.model train_data.scale.out
    

svm.h 和 svm.cpp 可以在 libSVM 包當中找到!程式碼當中用這兩個檔案把 training 好的 model load 進來,並且做分類!

參考資料:

  1. LIBSVM – A Library for Support Vector Machines
  2. piaip’s Using (lib)SVM Tutorial

4/05/2011

Ubuntu10.10 sound problem

1. 移除 pulseaudio 套件
2. 改裝 gnome-alsamixer
3. 重新啟動

...

4/02/2011

在 Ubuntu 下手動安裝 Nvidia driver

1. 到 Nvidia 下載對應的 linux 顯卡 driver, 會是個 .run 結尾的檔案

2. sudo gedit /etc/modprobe.d/blacklist.conf
 
加上下面幾行:

blacklist vga16fb
blacklist nouveau
blacklist rivafb
blacklist nvidiafb
blacklist rivatv

3. sudo apt-get --purge remove nvidia-* (移除已經安裝的 nvidia driver)

4. 重新啟動電腦,當系統問你要用低解析度瀏覽嗎,選擇不要,進入指令模式

5. sudo sh NVIDIA-Linux-x86_64-195.36.24-pkg2.run (安裝下載的 driver)

6. sudo /etc/init.d/gdm restart (重新啟動 X server)


參考資料:
1. http://blog.itman.cc/archives/ubuntu-install-nvidia-drivers-manually-on-lynx/
2. http://wiki.ubuntu-tw.org/index.php?title=HowtoInstallGraphicsDriver

...

3/31/2011

Ubuntu 10.10 下 OpenCV2.2 開發環境建置

0. 安裝 openjdk-6-jdk
1. 在 compile OpenCV 之前需要安裝的 package,以下 command 可以存成 script 執行

apt-get install build-essential
apt-get install cmake
apt-get install pkg-config
apt-get install libpng12-0 libpng12-dev libpng++-dev libpng3
apt-get install libpnglite-dev libpngwriter0-dev libpngwriter0c2
apt-get install zlib1g-dbg zlib1g zlib1g-dev
apt-get install libjasper-dev libjasper-runtime libjasper1
apt-get install pngtools libtiff4-dev libtiff4 libtiffxx0c2 libtiff-tools
apt-get install libjpeg8 libjpeg8-dev libjpeg8-dbg libjpeg-prog
apt-get install ffmpeg libavcodec-dev libavcodec52 libavformat52 libavformat-dev
apt-get install libgstreamer0.10-0-dbg libgstreamer0.10-0  libgstreamer0.10-dev
apt-get install libxine1-ffmpeg  libxine-dev libxine1-bin
apt-get install libunicap2 libunicap2-dev
apt-get install libdc1394-22-dev libdc1394-22 libdc1394-utils
apt-get install swig
apt-get install libv4l-0 libv4l-dev
apt-get install python-numpy
apt-get install libpython2.6 python-dev python2.6-dev

2. 下載 OpenCV2.2: http://sourceforge.net/projects/opencvlibrary/
3. 解壓縮 opencv source code, 切換到該目錄下,使用 command "cmake ." 建立 Makefile
4. 有 Makefile 之後就可以下 "make" 然後 "make install" 就完成啦!
5. 安裝完以後,header 和 lib 檔案會在 /usr/local/ 路徑之下,謹慎的設定到 eclipse 專案即可!

...

3/18/2011

[Git] 常用 git 指令筆記

1. Untrack files in git (當你不想要追蹤某個檔案,但是卻又不希望把它從資料夾刪除的時候使用)
git rm --cached filename

2. 切換 branch 時候,有東西沒有 commit 無法切換
先 git stash -> 切換 branch -> 切回來的時候再用 git stash pop
參考:http://ihower.tw/blog/archives/2620

3/04/2011

[Note] stackoverflow 上對於 ObjC 的 reference count 機制很不錯的解釋


來源:http://stackoverflow.com/questions/6578/understanding-reference-counting-with-cocoa-objective-c

Let's start with retain and releaseautorelease is really just a special case once you understand the basic concepts.
In Cocoa, each object keeps track of how many times it is being referenced (specifically, the NSObject base class implements this). By calling retain on an object, you are telling it that you want to up its reference count by one. By calling release, you tell the object you are letting go of it, and its reference count is decremented. If, after calling release, the reference count is now zero, then that object's memory is freed by the system.
The basic way this differs from malloc and free is that any given object doesn't need to worry about other parts of the system crashing because you've freed memory they were using. Assuming everyone is playing along and retaining/releasing according to the rules, when one piece of code retains and then releases the object, any other piece of code also referencing the object will be unaffected.
What can sometimes be confusing is knowing the circumstances under which you should call retain andrelease. My general rule of thumb is that if I want to hang on to an object for some length of time (if it's a member variable in a class, for instance), then I need to make sure the object's reference count knows about me. As described above, an object's reference count is incremented by calling retain. By convention, it is also incremented (set to 1, really) when the object is created with an "init" method. In either of these cases, it is my responsibility to call release on the object when I'm done with it. If I don't, there will be a memory leak.
Example of object creation:
NSString* s = [[NSString alloc] init];  // Ref count is 1
[s retain];                             // Ref count is 2 - silly
                                        //   to do this after init
[s release];                            // Ref count is back to 1
[s release];                            // Ref count is 0, object is freed
Now for autorelease. Autorelease is used as a convenient (and sometimes necessary) way to tell the system to free this object up after a little while. From a plumbing perspective, when autorelease is called, the current thread's NSAutoreleasePool is alerted of the call. The NSAutoreleasePool now knows that once it gets an opportunity (after the current iteration of the event loop), it can call release on the object. From our perspective as programmers, it takes care of calling release for us, so we don't have to (and in fact, we shouldn't).
What's important to note is that (again, by convention) all object creation class methods return an autoreleased object. For example, in the following example, the variable "s" has a reference count of 1, but after the event loop completes, it will be destroyed.
NSString* s = [NSString stringWithString:@"Hello World"];
If you want to hang onto that string, you'd need to call retain explicitly, and then explicitly release it when you're done.
Consider the following (very contrived) bit of code, and you'll see a situation where autorelease is required:
- (NSString*)createHelloWorldString{
    NSString* s = [[NSString alloc] initWithString:@"Hello World"];

    // Now what?  We want to return s, but we've upped its reference count.
    // The caller shouldn't be responsible for releasing it, since we're the
    // ones that created it.  If we call release, however, the reference 
    // count will hit zero and bad memory will be returned to the caller.  
    // The answer is to call autorelease before returning the string.  By 
    // explicitly calling autorelease, we pass the responsibility for
    // releasing the string on to the thread's NSAutoreleasePool, which will
    // happen at some later time.  The consequence is that the returned string 
    // will still be valid for the caller of this function.
    return [s autorelease];
}
I realize all of this is a bit confusing - at some point, though, it will click. Here are a few references to get you going:
  • Apple's introduction to memory management.
  • Cocoa Programming for Mac OS X (3rd Edition), by Aaron Hillegas - a very well written book will lots of great examples. It reads like a tutorial.
  • If you're truly diving in, you could head to Big Nerd Ranch. This is a training facility run by Aaron Hillegas - the author of the book mentioned above. I attended the Intro to Cocoa course there several years ago, and it was a great way to learn.