Fork me on GitHub

10/17/2013

How the Economic Machine Works


一個蠻通俗易懂的經濟解釋影片, 釐清了不少先前似懂非懂的疑惑, 以下筆記 ...
  • 三個經濟波動的主要的推力:
    1. 生產力成長
    2. 短期 debt cycle
    3. 長期 debt cycle
  • Transaction 是驅動經濟發展的基石, 每個 transaction 都由一個買方跟一個賣方組成, 之間交換 money/credit 來取得貨物, 服務或者其他金融資產
  • Buyer <-> Seller 等同於 Lender <-> Borrower
  • Lender 想由借出的錢賺取更多的錢, Borrower 想要取得更多的錢去得到他所想要的!
  • Lender 付出了 money 取得了 Borrower 的 credit, Borrower 付出了信用換到了錢去買他想要的東西, 但是同時也承擔了未來要償還本金和利息的義務 (debt)
  • 為什麼 credit 很重要, 因為有了 credit 你的花費就允許超過你的收入, 而花費就是驅動經濟的主因!因為一個人的花費就是其他人的收入, 當你有更多的花費代表別人有更多的收入, 有了更多的收入, 銀行就會比較信任然後借錢給你, 也就是你變得比較有 credit
  • increase income -> increase borrowing -> increase spending 不斷循環 (cycles)
  • 在沒有 credit 的時候, 增加 income 的唯一辦法是增加 productivity, 但是可以用 credit 來 borrow 的話, 不需要增加 productivity 也可以增加 income, 進而造成正向循環. 但是如果你用 credit 取得的額外收入拿去做的花費, 不能讓你生產更多的話, 遲早你需要付出代價償還
  • 當市場上的 spending 增加的速度大於 product 生產的速度, 價格就會上漲 -> inflation (通貨膨脹), 中央銀行可以透過調高利率來降低 borrow 的意願, 抑制通貨膨脹. 反過來說, 中央銀行也可以透過降低利率來刺激 borrow 進而刺激 spending
  • short-term debt 就是中央銀行透過調節利率來平衡 credit 的循環. 但儘管如此, 相較於償還 credit, 人類樂觀的天性更傾向於 借多花多以後再說, 所以 short-term debt 仍會慢慢累積越來越多的 debt 超出 income 進而造成 long-term debt
  • 當然, 在 debt 增加但是 income 也對應增加的情況下, 一切仍然是 under control, 這時候就會有一種大家都很有錢的假象. 大家的 income 因為 borrow 都很充裕, 可以拿去投資, 相對的有價資產價格就會飆升, 資產擁有者就覺得自己很有錢. 直到某個時間點, debt 增加的速度高過了 income, 就崩盤了
  • 人們開始 less spending -> less income -> less wealth -> less credit -> less borrowing ->, 這時候降低利率已經沒有用了, 因為重點是收入變少了, 就算借錢是 0 利率也無法幫助還清之前的 debt
  • 面對這種崩盤能有什麼對策:
    1. people, businesses, government cut their spending
    2. debt are reduced through defaults and reconstructings (lender 可以接受償還較少或是以較長的時間償還)
    3. wealth is redistributed
    4. the central bank prints new money
  • 1, 2, 3 都有可能會附帶造成負循環或者不良的社會影響, 而 4 則是刺激正向循環的一個手段. 中央銀行印鈔票去買財務資產, 資產價格上升使得個人的 credit 提昇, 這僅幫助了擁有資產的人. 而中央政府可以付錢買貨物或服務, 那些提供貨物和服務的人可以賺到政府的錢, 但中央政府不能印鈔票. 所以這兩者必須合作. 中央銀行向中央政府購買政府債卷, 即中央銀行借錢給中央政府, 中央政府拿錢取補助失業, 做刺激消費方案(消費卷..等等), 同時也增加了政府的負債. 但是這可以減輕整體 debt
  • 最後給個人的一些建議
    1. Don't have debt rise faster than income
    2. Don't have income rise faster than productivity
    3. Do all that you can to raise your productovity

6/27/2013

HTTP POST and PUT in REST way

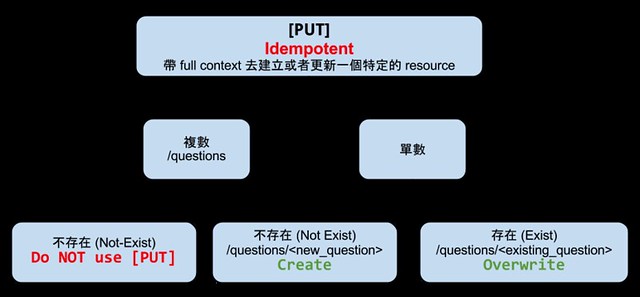
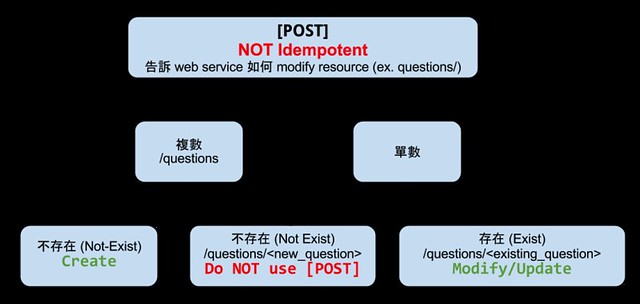
HTTP 的 Get/Post/Delete/Put 對應到 Resource 的 CRUD (Create, Retrieve, Update and Delete),其中 POST 和 PUT 最常讓人摸不著頭緒,不知道什麼時候該用什麼。

今天 survey 了一下網路的資料,大概可以歸納出如下兩張圖,未來在遇到相關的設計時可以參照琢磨琢磨。

http-post

http-put

References

  1. SO: PUT vs POST in REST
  2. PUT or POST: The REST of the Story

6/01/2013

Deploy Jersey in the Openfire plugin

Let's say, the original method to access the openfire service by http is by HttpServlet (ex. presence plugin). So, how to replace it with Jersey for convenient development? In this post, I will detail the steps and the problems I met during achieving this.

The main reference is here. Assuming that you have successfully run a self-made plugin.


Step1. Modify the web-custom.xml

The web-custom.xml tells the container where to search for resource class. From that reference. There is some tricks in the web-custom.xml processing in openfire. So we need a wrapper, and finding the true resource class package there. As below. The class in the <servlet-class> tag is your wrapper class, the path in <url-pattern> is the base url you want.

<!-- Servlets -->
<servlet>
    <servlet-name>BrownyServlet</servlet-name>
    <servlet-class>com.brownylin.openfire.plugin.browny.BrownyServletWrapper</servlet-class>
</servlet>

<!-- Servlet mappings -->
<servlet-mapping>
    <servlet-name>BrownyServlet</servlet-name>
    <url-pattern>/test</url-pattern>
</servlet-mapping>

Step2. Tell Wrapper where to find resource class

The trick in the wrapper class is to find resouce class by PackagesResourceConfig. Below sample is referenced from that link.

The resouce class should be under the same package (or inner) as the wrapper class.

AuthCheckFilter.addExclude(SERVLET_URL); is used for avoiding the need of login to access the api.

    
public class BrownyServletWrapper extends ServletContainer {

    private static final long serialVersionUID = 1L;
    private static final String SERVLET_URL = "browny/test/*";
    private static final String SCAN_PACKAGE_KEY = "com.sun.jersey.config.property.packages";
    private static final String SCAN_PACKAGE_DEFAULT = BrownyServletWrapper.class
        .getPackage().getName();

    private static final String RESOURCE_CONFIG_CLASS_KEY = "com.sun.jersey.config.property.resourceConfigClass";
    private static final String RESOURCE_CONFIG_CLASS = "com.sun.jersey.api.core.PackagesResourceConfig";

    private static Map<String, Object> config;
    private static PackagesResourceConfig prc;

    static {
        config = new HashMap<String, Object>();
        config.put(RESOURCE_CONFIG_CLASS_KEY, RESOURCE_CONFIG_CLASS);
        config.put(SCAN_PACKAGE_KEY, SCAN_PACKAGE_DEFAULT);
        prc = new PackagesResourceConfig(SCAN_PACKAGE_DEFAULT);
        prc.setPropertiesAndFeatures(config);
        prc.getClasses().add(BrownyResources.class);
    }

    public BrownyServletWrapper() {
        super(prc);
    }

    @Override
    public void init(ServletConfig servletConfig) throws ServletException {
        super.init(servletConfig);

        // Exclude this servlet from requering the user to login
        AuthCheckFilter.addExclude(SERVLET_URL);
    }

    @Override
    public void destroy() {
        super.destroy();
        // Release the excluded URL
        AuthCheckFilter.removeExclude(SERVLET_URL);
    }
}

Step3. The Jersey dependent jar library

They are asm-3.3.1.jar, jersey-bundle-1.10-b01.jar, jersey-servlet-1.17.1.jar, jsr311-api-1.1.1.jar. If wrong dependency, the ClassNotFoundException, ClassNotDefException will happen (you could find the error from openfire_src/target/openfire/logs/error.log)


Step4. The Resource class

The trick here is the @Path() should starts from plugin name, later servlet url-pattern and at the end - path of the your resouce. So that is @Path("browny/test/hello")

    
package com.brownylin.openfire.plugin.browny;

import javax.ws.rs.GET;
import javax.ws.rs.Path;
import javax.ws.rs.core.Response;

@Path("browny/test/hello")
public class BrownyResources {

    @GET
    @Path("/")
    public Response getMsg() {

        String output = "Jersey say Hello";
        return Response.status(200).entity(output).build();

    }
}

Step5. Don't want result shown in openfire admin console

As this thread said. The default configuration is to capture all text/html content from the server and force it into the admin page.

You could add the url pattern you want to exclude in openfire_src/src/web/WEB-INF/decorators.xml as below

<decorators defaultdir="/decorators">
    <decorator name="setup" page="setup.jsp">
        <pattern>/setup/*.jsp</pattern>
    </decorator>
    <decorator name="main" page="main.jsp">
          <pattern>/*.jsp</pattern>
          <pattern>/plugins</pattern>
    </decorator>
    <decorator name="none"/>
    <excludes>
        <pattern>/setup/setup-completed.jsp*</pattern>
        <pattern>/setup/setup-ldap-server_test.jsp*</pattern>
        <pattern>/setup/setup-ldap-user_test.jsp*</pattern>
        <pattern>/setup/setup-ldap-group_test.jsp*</pattern>
        <pattern>/setup/setup-clearspace-integration_test.jsp*</pattern>
        <pattern>/setup/setup-admin-settings_test.jsp*</pattern>
        <pattern>/login.jsp*</pattern>
        <pattern>/plugin-icon.jsp*</pattern>
        <pattern>/js/jscalendar/i18n.jsp*</pattern>
        <pattern>/plugins/browny/test/*</pattern>
    </excludes>
</decorators>

Step6. Test the resource url

Last, test the url localhost:9090/plugins/browny/test/hello. It's done. Hope this will be useful to someone :)

-- EOF --
5/13/2013

Git alias problem

Recently, don't know why, I found the git aliasing does not work. When I use git st aliasing command, I got below error:

fatal: cannot exec 'git-st': Not a directory
Problem is /usr/bin/python is not directed to directory

After search for a while, I found it should be caused by my environment variable PATH.

Use the command echo $PATH |tr ':' '\n' |xargs ls -ld, I found there is a symbolic link in the list /usr/bin/python -> python2.7 If it is removed, the git aliasing problem is gone.

I think it should be noticed that the environment path should points to directories not to files.

[~]$ echo $PATH |tr ':' '\n' |xargs ls -ld

drwxr-xr-x 2 root      root         4096 Apr 17 09:52 /bin
drwxrwxr-x 2 brownylin brownylin    4096 Apr 25 09:41 /home/brownylin/Java/maven3/bin
drwxr-xr-x 2 root      root        40960 May  9 13:07 /usr/bin
lrwxrwxrwx 1 root      root            9 Apr 15 15:54 /usr/bin/python -> python2.7
drwxr-xr-x 2 root      root         4096 Apr 24 11:34 /usr/local/bin


References

Git alias problem
http://stackoverflow.com/questions/4019501/git-alias-problem

5/06/2013

Personal wiki based on vimwiki

Recently, I am looking for a simple solution for personal wiki. My basic requirement is no need of database, easy deploy and lightweight.

Finally, I found the vimwiki is a perfect solution with some other services.

vimwiki: Simple syntax, perfectly integrated with vim. Export each single wiki to separate html file.
google-code-prettyfy: Used to make code snippets well formated.
Github pages: Used to host/publish the wiki.
Bootswatch: There are many beautiful and basic templates to beautify your wiki

Below is a brief description about how to setup the personal wiki which utilize above tools. Enjoy them :)


1. Vimwiki installation

https://code.google.com/p/vimwiki/wiki/Installation

  1. Download and unpack vimwiki_N_N.zip. (N_N is version number ie 0_8)
  2. Place unpacked files into (create directory if it isn't exists):
    Linux: ~/.vim/
    Windows: ~/vimfiles/, where ~ is a home directory, usually C:\Documents and Settings\USERNAME\
  3. To install help, open Vim and run :helptags ~/vimfiles/doc command.
  4. Modify vimrc as below, <F4> is mapped to generate html
" // --- vimwiki --- //
let g:vimwiki_list = [{'path': '~/Dropbox/vimwiki/',
			\'template_path': '~/Dropbox/vimwiki/template/',
			\'template_default': 'default',
			\'template_ext': '.html',
			\'path_html': '~/Dropbox/github/vimwiki/'}]

map <F4> :VimwikiAll2HTML<cr>


2. Use google-code-prettify for code highlight

https://code.google.com/p/google-code-prettify/

1. Download code-prettify (ex: prettify-small-4-Mar-2013.tar.bz2)
https://code.google.com/p/google-code-prettify/downloads/list

2. Modify the default vimwiki template
Add below code block before </head> and change <body> to <body onload='prettyPrint()'>

Use your prettify.js and prettify.css instead of http://XXX/prettify.css and ttp://XXX/prettify.js

<link href='http://XXX/prettify.css' rel='stylesheet' type='text/css'/>
<script language='javascript' src='http://XXX/prettify.js' type='text/javascript'/>
<script type='text/javascript'>
document.addEventListener(&#39;DOMContentLoaded&#39;,function() { prettyPrint();});
</script>

The result default.html of vimwiki should looks like as below

<html>
<head>
<link rel="Stylesheet" type="text/css" href="%root_path%%css%">
<title>%title%</title>
<meta http-equiv="Content-Type" content="text/html; charset=%encoding%">
<!-- Bootstrap: Bootswatch template goes here -->
<link href="http://XXX/bootstrap.min.css" rel="stylesheet"
media="screen" type='text/css'>

<!-- google-code-prettify -->
<link href='http://XXX/prettify.css' rel='stylesheet' type='text/css'/>
<script language='javascript' src='http://XXX/prettify.js' type='text/javascript'/>
<script type='text/javascript'>
document.addEventListener(&#39;DOMContentLoaded&#39;,function() { prettyPrint();});
</script>

</head>
<body onload='prettyPrint()'>
%content%
</body>
</html>


3. Use Github pages to host/publish you wiki

http://pages.github.com/

  1. Build a project page for the vimwiki
    https://help.github.com/articles/creating-project-pages-manually

4/22/2013

First week java web development - WD-041913

Last week, I start my journey on back-end web development. Below are some references from internet for getting some basic understanding on java web development.

Resources


Introduction into Java Web development

This tutorial introduces some basic concept about web development and java part: JSP and servlet.

REST with Java (JAX-RS) using Jersey - Tutorial

This helps me to build a simple JAX-RS web app and deploy it to Tomcat servlet container.

MySQL and Java JDBC - Tutorial & Connect To MySQL With JDBC Driver

These help me understand how to use JDBC to access MySQL database.

Definition


What is Java Servlet

A servlet is a Java programming language class used to extend the capabilities of a server. Technically speaking, a "servlet" is a Java class in Java EE that conforms to the Java Servlet API.

Servlets are most often used to

  • Process or store data that was submitted from an HTML form
  • Provide dynamic content such as the results of a database query
  • Manage state information that does not exist in the stateless HTTP protocol, such as filling the articles into the shopping cart of the appropriate customer

Problems


Below are some solution for the problem I met

INSTALLING Oracle Java JDK 7 On Ubuntu 12.04 Step By Step

How do I import the javax.servlet API in my Eclipse project?

Right click on project ---> Properties ---> Java Build Path ---> Add Library... ---> Server Runtime ---> Apache Tomcat ----> Finish.

Apache2, MySQL, php, phpmyadmin installation on ubuntu12.04

注意,要把 phpadmin conf 加到 apache 裡面

Ref: 1, 2

sudo vim /etc/apache2/apache2.conf  
Include /etc/phpmyadmin/apache.conf //Add the phpmyadmin config to the file    
sudo service apache2 restart //then restart apache

Java Naming and Directory Interface

-- EOF --

4/03/2013

[Bash] Annoying directory green highlight in terminal

Recently, I found some directory become green highlighted in the background when I issue ls command as below picture.

After google that, it is due to the write permission of the others (as the red mark in the picture). There are 2 ways to fix this annoying coloring.

  1. Change the bash color setting: refer to the Reference 2
  2. Use the chmod to recover the directory permission to default 755, or use below command to recursively set all directory to default 755

    $ find . -type d -print0 | xargs -0 chmod 755 
    

Ref

  1. Gnome-terminal syntax highlighting - green highlight?
  2. NTFS directory coloring in terminal
  3. Wikipedia: File system permissions
  4. Wikipedia: Sticky_bit
  5. How to chmod 755 all directories but no file (recursively)

--EOF--

3/31/2013

[Algorithm] Money Change Problem (dynamic programming)

Question

Given a list of N coins, their values being in an array A[], return the minimum number of coins required to sum to S (you can use as many coins you want). If it's not possible to sum to S, return -1

Below are the solutions by "greedy" and "dynamic programming"
#include <cmath>
#include <vector>
#include <iostream>
#include <algorithm>
#include <stdio.h>
#include <stdlib.h>
using namespace std;

// greedy
int minCoins_greedy(vector<int> a, int sum) {

    sort(a.begin(), a.end(), greater<int>()); // sorted in descending order
    a.erase(unique(a.begin(), a.end()), a.end()); // remove duplicates

    int ret;
    for (int i = 0; i < a.size(); i  ) {
        int remains = sum - a[i];
        //cout << sum << " - " << a[i] << " = " << remains << endl;
        if (remains > 0) {
            ret = minCoins_greedy(a, remains);
            //cout << "ret: " << ret << endl;
            if (ret > 0) {
                cout << a[i] << "   ";
                return   ret;
            }
        } else if (remains == 0) {
            cout << a[i] << "   ";
            return 1;
        }
    }
    return -1;
}

// dynamic programming
#define MIN(a, b) ((a) == -1) ? (b) : min((a),(b));
int minCoins(vector<int> S, int sum) {

    int setSize = S.size();
    int count[setSize 1][sum 1];

    // For sum = 0, do not need any coins
    for (int i = 0; i < setSize 1; i  )
        count[i][0] = 0;

    // For empty set, it is impossible to sum to >0
    // use -1 represents fail
    for (int j = 1; j < sum 1; j  )
        count[0][j] = -1;

    /*
     * cost func:
     * c(n, m) = min( c(n-1, m) , c(n, m-M[n])   1 )
     *                ^^^^^^^^^   ^^^^^^^^^^^^^^^^
     *                don't take     take M[n]
     */
    for (int i = 1; i < setSize 1; i  ) {
        for (int j = 1; j < sum 1; j  ) {
            if ((j - S[i-1]) >= 0) {
                count[i][j] = MIN(count[i-1][j], count[i][j-S[i-1]]   1);
            }
            else
                count[i][j] = count[i-1][j];
        }
    }

    // uncomment this code to print table
    /*
    for (int i = 0; i <= setSize; i  )
    {
        for (int j = 0; j <= sum; j  )
            printf ("%4d", count[i][j]);
        printf("\n");
    }
    */

    return count[setSize][sum];
}


int main() {

    // Input to a sorted vector
    int size, sum;
    cout << "input 'size' and 'sum'" << endl;
    cout << "ex: 4 63" << endl;
    cin >> size >> sum;

    cout << "input coins" << endl;
    cout << "ex: 1 10 30 40" << endl;

    int* arr;
    arr = new int[size];
    for (int i = 0; i < size; i  ) {
        int c;
        cin >> c;
        arr[i] = c;
    }
    vector<int> vecArr(arr, arr size);

    // Output
    int out = minCoins(vecArr, sum);
    //int out = minCoins_greedy(vecArr, sum);

    cout << endl;
    if (out > 0)
        cout << "Minimum " << out << " coins needed" << endl;
    else
        cout << "Impossible" << endl;

    delete[] arr;

    return 0;
}

Ref

  1. Wikipedia: Dynamic programming
  2. Lecture 12: More about debugging, knapsack problem, introduction to dynamic programming
  3. The 0/1 Knapsack Problem - Dynamic Programming Method
  4. Dynamic Programming | Set 25 (Subset Sum Problem)
  5. Money Changing Problem 之一

3/10/2013

[C++] Reference to Pointer

Recently, I met the usage of reference of the pointer as the function parameter. I don't know what the purpose of it, and google the answer for it.

The 1st ref. well explains the difference between "pass by pointer" and "pass by reference of the pointer". The key is the default parameter passing of C/C++ is "pass by value", evne the pointer.

The 2nd ref. shows the situation which the reference of pointer come to solve elegantly

Ref

  1. C++: Reference to Pointer

  2. why pointer to pointer is needed to allocate memory in function