8/30/2010
8/29/2010
iPhone 當中的 delegate(委派) 機制筆記
委派是一種簡單的設計機制。並非什麼特別的語法或者語言特性。
委派的概念簡單來說就是,一個物件幫另外一個物件處理某些任務。一個委派物件透過其 conform 的 protocol 來釐清他應該處理哪些任務。而 protocol 當中有一些 method 是設定為 optional 的,這類的 method 在 conform 該 protocol 的時候,不一定需要實作。
可以想像經理和秘書的關係,經理像是一個物件,秘書就像是一個委派物件。當經理需要傳真文件的時候,會發出一個訊息,告訴秘書(委派物件),這件事該由他來做。秘書要怎麼知道要傳真到哪裡呢?當然這個消息是由經理提供,因為秘書 conform 的 protocol 當中,有明確的規範傳真這件事情的輸入參數,所以只要提供正確的資料就能夠正確的執行代理任務。
如上程式碼:DetailViewController 是一個 UIViewController 並且 conforms UITableViewDelegate 和 UITableViewDataSource 兩個 protocol。代表 DetailViewController 這個類型的物件可以當做 UITableView 的 delegate 和 data source。
參考資料:
iPhone Programming Concepts – The Delegate
Delegates and Protocols
Delegation pattern
設計模式複習筆記(委托機制)
Delegates and Data Sources
......
委派的概念簡單來說就是,一個物件幫另外一個物件處理某些任務。一個委派物件透過其 conform 的 protocol 來釐清他應該處理哪些任務。而 protocol 當中有一些 method 是設定為 optional 的,這類的 method 在 conform 該 protocol 的時候,不一定需要實作。
可以想像經理和秘書的關係,經理像是一個物件,秘書就像是一個委派物件。當經理需要傳真文件的時候,會發出一個訊息,告訴秘書(委派物件),這件事該由他來做。秘書要怎麼知道要傳真到哪裡呢?當然這個消息是由經理提供,因為秘書 conform 的 protocol 當中,有明確的規範傳真這件事情的輸入參數,所以只要提供正確的資料就能夠正確的執行代理任務。
@interface DetailViewController : UIViewController <UITableViewDelegate, UITableViewDataSource>
如上程式碼:DetailViewController 是一個 UIViewController 並且 conforms UITableViewDelegate 和 UITableViewDataSource 兩個 protocol。代表 DetailViewController 這個類型的物件可以當做 UITableView 的 delegate 和 data source。
參考資料:
iPhone Programming Concepts – The Delegate
Delegates and Protocols
Delegation pattern
設計模式複習筆記(委托機制)
Delegates and Data Sources
......
8/21/2010
OOD 物件導向設計原則
閱讀這篇好文的心得筆記:How I explained OOD to my wife
Object Oriented Principle (物件導向原則):抽象、繼承與多型,就像是基本的單字和文法,是建構出一篇好文章的基本工具。而 Object Oriented Design (物件導向設計) 則是站在更高一層,探討如何利用這些基本的工具,寫出一篇好文章。
為什麼需要 OOD ?
軟體設計為了解決現實生活遇到的問題,而現實就是不斷的演進和改變。所以一個被良好設計的軟體也應該要能適應這樣的改變。好的軟體具備了三個要素:1. 容易因應改變、2. 易於擴展、3. 可重用的。
要怎麼做到這三點呢,前人提出了許多設計原則,可以簡要成一個 SOLID 口訣的五大原則
S = Single Responsibility Principle 單一責任原則
O = Opened Closed Principle 開放封閉原則
L = Liscov Substitution Principle 虎父無犬子原則
I = Interface Segregation Principle 介面簡單原則
D = Dependency Inversion Principle 依賴反轉原則
以下一一說明:
1. 單一責任原則
要去修改一個 class 不應該有超過一種的理由 (也就是說,一個 class 應該只有一項責任)
如果你的 class 因為超過一種理由而需要被改變,那代表這個 class 需要進一步被細分為更小的 class。
因為每一種責任都是一種改變的可能性,當 class 擁有多重任務的時候,程式碼之間關係會變得錯綜複雜。

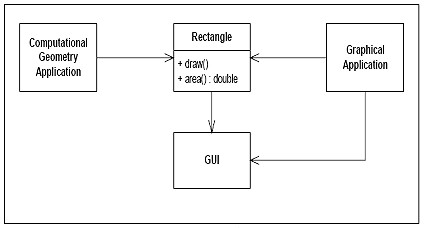
如上圖的例子來說,Rectangle 這個 class 做了兩件事:
1. 計算長方形的面積 2. 將長方形畫到UI上面
這意味著在 Geometry Application 中,因為要用到 Rectangle class 所以也會間接的把給 Graphic Application 用的方法或者所需要的 library 給涵蓋進來,反之亦然。再者,當Geometry Application 需要 Rectangle class 做一些改變的時候,勢必也將會影響到 Graphic Application 的運作,需要耗費時間修改確定其影響。因此將 Rectangle class 在進一步細分 Rectangle 和 RectangleUI 兩個 class 比較適當。
2. 開放封閉原則
"Open for Extension, but Closed for Modification"
簡單來說,擴展一個 class 的行為,只需要增加程式碼,而不用對現有程式碼做修改。就好像你要改變你的造型,只需要穿上不一樣的衣服,而不用改變你的身體。

上圖的 class 階層違反了開放封閉原則。當 Server 因某種需求需要該變,Client 也需要跟著改變。就像 client 瀏覽器的實作若是和 server 緊緊相關連的話,那麼臨時要換另外一種 server,client 端的 code 也需要跟著改變。

如上圖,假若兩者之間有一個抽象層 (Abstract Server),而真正的 server 實現了這個抽象 server,那麼假若 server 需要改變就不會影響到 client 端的實作。
因此系統當中的核心觀念若能抽象得當,將來在遇到改變或者擴展需求的時候就會比較容易。
3. 虎父無犬子原則
子類別應該能夠取代其父類別。換句話說,function 當中使用指向 base type 的 reference 應該能夠傳 derived type 的物件進去,而不需要任何檢查。
這不就是多型嗎?
Liskov's Substitution Principle 就是用來確保繼承使用得當的原則。

如上圖,Ostrich 是一種鳥,但是他其實不會飛,違反了這個原則。
違反了這個原則,當你將子類別傳入父類別的參考,你無法確定發生什麼奇怪的行為;其二,針對父類別成功的單元測試,在子類別身上永遠會失敗。
4. 介面簡單原則
"Clients should not be forced to depend upon interfaces that they do not use" 保持介面的簡單明瞭!
假如公開太多的方法,會讓介面變得肥大且混亂,此外,凡是當另外一個 class 要實現這個介面的時候,將也需要一同實現那些實際上並不需要的方法。因此介面的設計原則為,他們有明確的任務,容易了解且可重用。

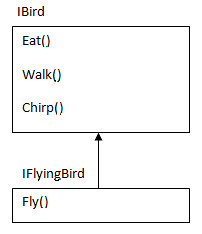
如上圖例,IBird 介面當中若包含了 Fly 方法,但是 Ostrich 這種鳥並不會飛,因此應該在把這個特定的方法,分出一個介面如上圖。
5. 依賴反轉原則
"高階模組不應該依賴低階模組,而是兩者都應該依賴抽象"
車子是由需多元件組成,像是引擎、輪胎等等。然而這些元件都是可外掛的,當你需要更換這些元件的時候,你只需要確認這些元件和你的車子是可匹配的。
假如這些元件並不具備外掛的特性時,如果你的引擎壞掉了,而相同一模一樣的引擎也賣光了,這時可能就要修改車子來配合別的引擎,或者換一台車!
車子就好像一個高階的模組,而他依賴低階的模組像是引擎和輪子。但是,與其直接依賴引擎和輪子,車子應該要倚賴的是引擎和輪子抽象的規格,那麼只要那些符合規格的引擎和輪子都可以讓這輛車子順利啟動。

如上圖的 Car class,有兩個抽象的 interface 屬性,而非具體的型別。因此這輛車子可以接受任何實現了這個介面規格的引擎和輪子。
當我們不貫徹這個原則的話有可能發生:
1. 高階的模組需要直接使用低階的 class
2. 當低階 class 需要改變的時候,高階模組也需要相應的改變
3. 不易重用
當然,還有許多 OOD Priciple
Composition over Inheritance” : This says about favoring composition over inheritance.
“Principle of least knowledge” : This says that "the less your class knows, the better".
“The Common Closure Principle” : This says that "related classes should be package together"
“The Stable Abstractions Principle” : This says that "the more stable a class is, the more it must consist of abstract class."
......
Object Oriented Principle (物件導向原則):抽象、繼承與多型,就像是基本的單字和文法,是建構出一篇好文章的基本工具。而 Object Oriented Design (物件導向設計) 則是站在更高一層,探討如何利用這些基本的工具,寫出一篇好文章。
為什麼需要 OOD ?
軟體設計為了解決現實生活遇到的問題,而現實就是不斷的演進和改變。所以一個被良好設計的軟體也應該要能適應這樣的改變。好的軟體具備了三個要素:1. 容易因應改變、2. 易於擴展、3. 可重用的。
要怎麼做到這三點呢,前人提出了許多設計原則,可以簡要成一個 SOLID 口訣的五大原則
S = Single Responsibility Principle 單一責任原則
O = Opened Closed Principle 開放封閉原則
L = Liscov Substitution Principle 虎父無犬子原則
I = Interface Segregation Principle 介面簡單原則
D = Dependency Inversion Principle 依賴反轉原則
以下一一說明:
1. 單一責任原則
要去修改一個 class 不應該有超過一種的理由 (也就是說,一個 class 應該只有一項責任)
如果你的 class 因為超過一種理由而需要被改變,那代表這個 class 需要進一步被細分為更小的 class。
因為每一種責任都是一種改變的可能性,當 class 擁有多重任務的時候,程式碼之間關係會變得錯綜複雜。

如上圖的例子來說,Rectangle 這個 class 做了兩件事:
1. 計算長方形的面積 2. 將長方形畫到UI上面
這意味著在 Geometry Application 中,因為要用到 Rectangle class 所以也會間接的把給 Graphic Application 用的方法或者所需要的 library 給涵蓋進來,反之亦然。再者,當Geometry Application 需要 Rectangle class 做一些改變的時候,勢必也將會影響到 Graphic Application 的運作,需要耗費時間修改確定其影響。因此將 Rectangle class 在進一步細分 Rectangle 和 RectangleUI 兩個 class 比較適當。
2. 開放封閉原則
"Open for Extension, but Closed for Modification"
簡單來說,擴展一個 class 的行為,只需要增加程式碼,而不用對現有程式碼做修改。就好像你要改變你的造型,只需要穿上不一樣的衣服,而不用改變你的身體。

上圖的 class 階層違反了開放封閉原則。當 Server 因某種需求需要該變,Client 也需要跟著改變。就像 client 瀏覽器的實作若是和 server 緊緊相關連的話,那麼臨時要換另外一種 server,client 端的 code 也需要跟著改變。

如上圖,假若兩者之間有一個抽象層 (Abstract Server),而真正的 server 實現了這個抽象 server,那麼假若 server 需要改變就不會影響到 client 端的實作。
因此系統當中的核心觀念若能抽象得當,將來在遇到改變或者擴展需求的時候就會比較容易。
3. 虎父無犬子原則
子類別應該能夠取代其父類別。換句話說,function 當中使用指向 base type 的 reference 應該能夠傳 derived type 的物件進去,而不需要任何檢查。
這不就是多型嗎?
Liskov's Substitution Principle 就是用來確保繼承使用得當的原則。

如上圖,Ostrich 是一種鳥,但是他其實不會飛,違反了這個原則。
違反了這個原則,當你將子類別傳入父類別的參考,你無法確定發生什麼奇怪的行為;其二,針對父類別成功的單元測試,在子類別身上永遠會失敗。
4. 介面簡單原則
"Clients should not be forced to depend upon interfaces that they do not use" 保持介面的簡單明瞭!
假如公開太多的方法,會讓介面變得肥大且混亂,此外,凡是當另外一個 class 要實現這個介面的時候,將也需要一同實現那些實際上並不需要的方法。因此介面的設計原則為,他們有明確的任務,容易了解且可重用。

如上圖例,IBird 介面當中若包含了 Fly 方法,但是 Ostrich 這種鳥並不會飛,因此應該在把這個特定的方法,分出一個介面如上圖。
5. 依賴反轉原則
"高階模組不應該依賴低階模組,而是兩者都應該依賴抽象"
車子是由需多元件組成,像是引擎、輪胎等等。然而這些元件都是可外掛的,當你需要更換這些元件的時候,你只需要確認這些元件和你的車子是可匹配的。
假如這些元件並不具備外掛的特性時,如果你的引擎壞掉了,而相同一模一樣的引擎也賣光了,這時可能就要修改車子來配合別的引擎,或者換一台車!
車子就好像一個高階的模組,而他依賴低階的模組像是引擎和輪子。但是,與其直接依賴引擎和輪子,車子應該要倚賴的是引擎和輪子抽象的規格,那麼只要那些符合規格的引擎和輪子都可以讓這輛車子順利啟動。

如上圖的 Car class,有兩個抽象的 interface 屬性,而非具體的型別。因此這輛車子可以接受任何實現了這個介面規格的引擎和輪子。
當我們不貫徹這個原則的話有可能發生:
1. 高階的模組需要直接使用低階的 class
2. 當低階 class 需要改變的時候,高階模組也需要相應的改變
3. 不易重用
當然,還有許多 OOD Priciple
Composition over Inheritance” : This says about favoring composition over inheritance.
“Principle of least knowledge” : This says that "the less your class knows, the better".
“The Common Closure Principle” : This says that "related classes should be package together"
“The Stable Abstractions Principle” : This says that "the more stable a class is, the more it must consist of abstract class."
......
Labels:
OO,
programming
8/10/2010
[Mac OS X] 如何得到 UIImage/CGImage 的 piexl 資料
透過 UIImagePickerControllerDelegate 取得影像的 UIImage 資料之後,該如何取得 UIImage 當中的像素資料,以進行接下來的影像處理,在此記錄一下。
首先參考的是這篇 Getting the pixel data from a CGImage object,當中提到的第一個方法 CGDataProviderCopyData 在 Mac OS X 10.5 以後才出現,相當方便但是無法確定自己得到的 color model 是否和影像一致,如當中的 WARNING 所說明:
比較保險的作法,也就是在 Mac OS X 10.5 之前的作法,是自行 create 一個 bitmap context,然後利用 CGDrawImage 將影像畫到這個你指定格式的 context 上頭,如此一來你就可以利用 CGBitmapContextGetData 來取得影像的像素資料!
其中在利用 CGBitmapContextCreate 建立 bitmap context 時候有一個 colormodel 參數,該資料當中的 CGColorSpaceGenericRGB 已經被 deprecated 了,解決的方案是利用 CGColorSpaceCreateDeviceRGB() 取代,請參考 Warning: kCGColorSpaceGenericRGB is deprecated。
針對像素處理完畢之後,需要由處理過後的 CGImage 創建一個新的 UIImage 然後指定到你要顯示的地方:
參考上述兩點,整理的程式碼如下:
其中的 CreateARGBBitmapContext 方法如下:
參考資料:
如何把照片加到 iPhone Simulator 的 Library 當中
http://www.youtube.com/watch?v=1NqHnYGNAp8
OpenGL ES from the Ground Up: Table of Contents
http://iphonedevelopment.blogspot.com/2009/05/opengl-es-from-ground-up-table-of.html
如何得到 CGImage 的 pixel data
http://developer.apple.com/mac/library/qa/qa2007/qa1509.html
Warning: kCGColorSpaceGenericRGB is deprecated
http://iphoneinaction.manning.com/iphone_in_action/2009/06/warning-kcgcolorspacegenericrgb-is-deprecated.html
Convert CGImage to UIImage
http://www.iphonedevsdk.com/forum/iphone-sdk-development/21806-convert-cgimage-uiimage.html
......
首先參考的是這篇 Getting the pixel data from a CGImage object,當中提到的第一個方法 CGDataProviderCopyData 在 Mac OS X 10.5 以後才出現,相當方便但是無法確定自己得到的 color model 是否和影像一致,如當中的 WARNING 所說明:
WARNING: The pixel data returned by CGDataProviderCopyData has not been color matched and is in the format that the image is in, as described by the various CGImageGet functions (see for Getting Information About an Image more information)
比較保險的作法,也就是在 Mac OS X 10.5 之前的作法,是自行 create 一個 bitmap context,然後利用 CGDrawImage 將影像畫到這個你指定格式的 context 上頭,如此一來你就可以利用 CGBitmapContextGetData 來取得影像的像素資料!
IMPORTANT: 以下範例 creates a bitmap context with a 8-bits per component ARGB color space, draws the source image to this context, then retrieves the image bits in this color space from the context. Regardless of what the source image format is (CMYK, 24-bit RGB, Grayscale, and so on) it will be converted over to this color space. For more information about creating bitmap contexts for other pixel formats, see the Quartz 2D Programming Guide.
其中在利用 CGBitmapContextCreate 建立 bitmap context 時候有一個 colormodel 參數,該資料當中的 CGColorSpaceGenericRGB 已經被 deprecated 了,解決的方案是利用 CGColorSpaceCreateDeviceRGB() 取代,請參考 Warning: kCGColorSpaceGenericRGB is deprecated。
針對像素處理完畢之後,需要由處理過後的 CGImage 創建一個新的 UIImage 然後指定到你要顯示的地方:
newImgRef = CGBitmapContextCreateImage(cgctx);
UIImage *newimg = [UIImage imageWithCGImage:newImgRef];
imageView.image = newimg;
參考上述兩點,整理的程式碼如下:
- (void)imagePickerController:(UIImagePickerController *)picker
        didFinishPickingImage:(UIImage *)image
        editingInfo:(NSDictionary *)editingInfo
{
 CGImageRef imageRef = image.CGImage;

 // Create the bitmap context
        cgctx = CreateARGBBitmapContext(imageRef);
        if (cgctx == NULL)
        {
        // error creating context
        return;
        }

 // Get image width, height.
        size_t w = CGImageGetWidth(imageRef);
        size_t h = CGImageGetHeight(imageRef);
        CGRect rect = {{0,0},{w,h}};

 // Draw the image to the bitmap context. Once we draw, the memory
        // allocated for the context for rendering will then contain the
        // raw image data in the specified color space.
        CGContextDrawImage(cgctx, rect, imageRef);

 // Now we can get a pointer to the image data associated with the bitmap
        // context.
        void *data = CGBitmapContextGetData(cgctx);
 imagePtr = data;
 unsigned char A, R, G, B;

        if (imagePtr != NULL)
        {
            // **** You have a pointer to the image data ****
            // **** Do stuff with the data here ****
     for (int x = 0; x < w; x  ) {
         for (int y = 0; y < h; y  ) {

      A = imagePtr[(x (y*w))*4 + 0];
      R = imagePtr[(x (y*w))*4 + 1];
      G = imagePtr[(x (y*w))*4 + 2];
      B = imagePtr[(x (y*w))*4 + 3];
  }
     }
        }

 newImgRef = CGBitmapContextCreateImage(cgctx);
 UIImage *newimg = [UIImage imageWithCGImage:newImgRef];


 // do something with selectedImage and originalImage
 imageView.image = newimg;
        [picker dismissModalViewControllerAnimated:YES];
}
其中的 CreateARGBBitmapContext 方法如下:
CGContextRef CreateARGBBitmapContext (CGImageRef inImage)
{
    CGContextRef    context = NULL;
    CGColorSpaceRef colorSpace;
    void *          bitmapData;
    int             bitmapByteCount;
    int             bitmapBytesPerRow;

 // Get image width, height. We'll use the entire image.
    size_t pixelsWide = CGImageGetWidth(inImage);
    size_t pixelsHigh = CGImageGetHeight(inImage);

    // Declare the number of bytes per row. Each pixel in the bitmap in this
    // example is represented by 4 bytes; 8 bits each of red, green, blue, and
    // alpha.
    bitmapBytesPerRow   = (pixelsWide * 4);
    bitmapByteCount     = (bitmapBytesPerRow * pixelsHigh);

    // Use the generic RGB color space.
    colorSpace = CGColorSpaceCreateDeviceRGB();
    if (colorSpace == NULL)
    {
        fprintf(stderr, "Error allocating color space\n");
        return NULL;
    }

    // Allocate memory for image data. This is the destination in memory
    // where any drawing to the bitmap context will be rendered.
    bitmapData = malloc( bitmapByteCount );
    if (bitmapData == NULL)
    {
        fprintf (stderr, "Memory not allocated!");
        CGColorSpaceRelease( colorSpace );
        return NULL;
    }

    // Create the bitmap context. We want pre-multiplied ARGB, 8-bits
    // per component. Regardless of what the source image format is
    // (CMYK, Grayscale, and so on) it will be converted over to the format
    // specified here by CGBitmapContextCreate.
    context = CGBitmapContextCreate (bitmapData,
          pixelsWide,
          pixelsHigh,
          8,      // bits per component
          bitmapBytesPerRow,
          colorSpace,
          kCGImageAlphaPremultipliedFirst);
    if (context == NULL)
    {
        free (bitmapData);
        fprintf (stderr, "Context not created!");
    }

    // Make sure and release colorspace before returning
    CGColorSpaceRelease( colorSpace );

    return context;
}
參考資料:
如何把照片加到 iPhone Simulator 的 Library 當中
http://www.youtube.com/watch?v=1NqHnYGNAp8
OpenGL ES from the Ground Up: Table of Contents
http://iphonedevelopment.blogspot.com/2009/05/opengl-es-from-ground-up-table-of.html
如何得到 CGImage 的 pixel data
http://developer.apple.com/mac/library/qa/qa2007/qa1509.html
Warning: kCGColorSpaceGenericRGB is deprecated
http://iphoneinaction.manning.com/iphone_in_action/2009/06/warning-kcgcolorspacegenericrgb-is-deprecated.html
Convert CGImage to UIImage
http://www.iphonedevsdk.com/forum/iphone-sdk-development/21806-convert-cgimage-uiimage.html
......
Labels:
image processing,
iPhone,
Mac,
programming
8/04/2010
[C] 測量程式執行時間
#include <time.h>
#include <stdio.h>
#include <stdlib.h>

int main(void)
{
    int count,a;
    clock_t c0, c1;
    double cputime;
    c0 = clock();

    /* foo()  */
    for (count = 1l; count < 12345678; count  ) {
        a = 64*64;
    }
    /* end foo( 0 */

    c1= clock();
    cputime = (c1 - c0)/(CLOCKS_PER_SEC );

    printf ("\tElapsed CPU time test:   %f  sec\n",cputime);

    return 0;
}
HMM 程式碼學習資源
Hidden Markov Models in C#
http://crsouza.blogspot.com/2010/03/hidden-markov-models-in-c.html#using
http://www.codeproject.com/Articles/69647/Hidden-Markov-Models-in-Csharp.aspx
用Excel徹底了解Baum-Welch Algorithm流程
An Interactive Spreadsheet for Teaching the Forward-Backward Algorithm (2002)
http://www.cs.jhu.edu/~jason/papers/#tnlp02
Linux平台的HMM Source Code
Hidden Markov Model (HMM) Software: Implementation of Forward-Backward, Viterbi, and Baum-Welch algorithms
http://www.kanungo.com/software/software.html#umdhmm
A C++ Implementation of Hidden Markov Model
http://webdocs.cs.ualberta.ca/~lindek/hmm.htm
Labels:
HMM,
learning,
resource,
source code
在 Mac 上跑 CUDA
1. 先按照 Getting Start MacOS 文件上的步驟依序將 Driver, Toolkit 和 SDK 安裝完成。
其中有一個步驟必須設定環境變數可以參考如下:http://macuknow.com/node/4674
於終端機上輸入 "vi ~/.bash_profile " (於家目錄下開啟名為.bash_profile之文字檔)
先按一下 "i" 鍵 插入文字, 並將下列兩行貼上
export PATH=/usr/local/cuda/bin:$PATH
export DYLD_LIBRARY_PATH=/usr/local/cuda/lib:
再按一下 "esc" 鍵 結束編輯
並鍵入 ":wq" 儲存離開
2. 安裝完成後,驗證安裝
在 terminal window 當中執行 "ncvv -V"
3. 在 CUDA SDK 當中有許多範例程式可以參考,必須先他們 compile 一遍產出執行檔。
到 "/Developer/GPU Computing/C" 路徑下,執行 "make" 指令,於是這些範例程式的執行檔都會被輸出至
"/Developer/GPU Computing/C/bin/darwin/release" 當中。於是可以執行 deviceQuery 這個範例看看自己 GPU
的硬體規格。
4. 目前寫程式仍然是在 windosw 當中利用 VS2008,測試效能則在有 CUDA enabled 顯示卡的小白上執行,
所以該如何將寫好的 cuda 程式碼,放進 mac 編譯執行呢!
4-1 CUDA SDK 的路徑 "/Developer/GPU Computing/C/src/" 下有很多範例專案,可以在此隨便複製一個然後
在偷偷更名,並且將資料夾當中的檔案置換成自己寫的 CUDA 程式碼。
4-2 這邊要注意,如果你的專案必須要 include 什麼 .h 檔的話,需要自行修改當中的 Makefile。
4-3 如果專案當中有使用到 CImag 的話,在 Makefile 當中的最底下那一行 "include ../../common/common.mk",
找到 common.mk 這個檔案,並且加入以下:
# for CImg
LINK := g++ -fPIC -O2 -lm -lpthread -L/usr/X11R6/lib -lm -lpthread -lX11
因為 CImg 有使用到 X11 的一些 function 所以必須要把這個連結加進去 (http://cimg.sourceforge.net/reference/group__cimg__overview.html)
4-4 compile 的話就將 terminal window 指到專案路徑下,執行 "make" 指令,就會輸出執行檔至
"/Developer/GPU Computing/C/bin/darwin/release" 當中
4-5 需要注意的是,如果有用到 CImg 當中顯示影像或者相關影像編輯的功能,則必須透過 X11 來執行這個執行檔
方法是:打開 X11,將路徑指到該執行檔之路徑,執行 "./cudaApp"
...
Labels:
CUDA,
environment,
Mac
Subscribe to:
Posts (Atom)
