Fork me on GitHub

12/03/2010

OpenCV, Qt 開發 by Eclipse IDE


前提:已經完成 Windows 下 Eclipse IDE for C/C++ Developers (Helios SR 1) 安裝與環境配置

I. OpenCV

1. 安裝 OpenCV

Windows 系統下,直接傻瓜安裝 OpenCV 2.1.0 with Visual Studio 2008,按照網頁上的安裝指示,記得安裝過程要勾選 "Add OpenCV to the system PATH for all users"。

Mac 系統下,用 MacPorts 安裝最為簡便,完成後 OpenCV 會散佈在 /opt/local/bin、/opt/local/include 和 /opt/local/lib 當中。

2. Eclipse 專案設定
接著就是要將這些裝好的 dll, lib, header 連結到 openCV 的專案當中。

Windows 下:在 Eclipse 內設定專案屬性,這邊要設定的有兩項 include 和 lib。include 在 GCC C++ Compiler 中的 includes 下設定 (選擇 All configuration 都指定到你安裝 opencv 位置下的 include 資料夾);lib 在 MinGW C++ Linker 中的 Libraries 中設定 (Debug 用 cv210d, cxcore210d, highgui210d, Release 則用 cv210, cxcore210, highgui210)。

Mac 下:和 Windows 大同小異,Linker 換成 MacOS X C++ Linker,include 和 lib 檔案要到 opt/local 當中去找一下,由於 library 是動態連結庫 (檔名會像 libcv2.1.0.dylib 這樣),注意要將頭尾去掉,輸入 cv2.1.0 即可。

II Qt4

Windows 下

1. 安裝 Qt Library (qt-win-opensource-4.7.1-mingw.exe)
安裝過程當中可能會針對 MinGW 當中的 w32api.h 提出一點警告,不需理會按 Yes 即可。

2. 安裝 Qt Eclipse Integration (qt-eclipse-integration-win32-1.6.1.exe)
安裝過程當中會需要你輸入你 Qt Library 的安裝路徑 和 MinGW 的安裝路徑 (例:C:\Qt\4.7.1\bin,C:\MinGW\bin)

3. 如果像要在 Qt 的程式碼當中使用 debug 功能,則需執行此步驟。
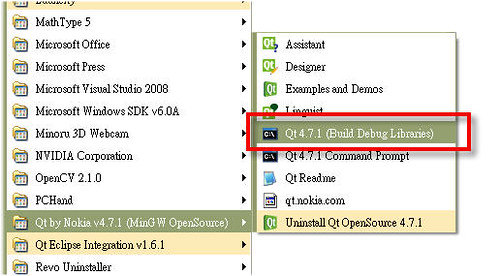
完成第一步驟之後,在程式選單當中執行 Qt 4.7.1 (Build Debug Libraries),會問一些問題,依序輸入 'enter’ –> 'o' –> 'y'。附註:這個步驟耗時很久,可以去睡一覺,大概 2 小時左右。


4. 啟動 Eclipse,設定 Qt
進入選單 Windows –> Preferences –> Qt 把那些欄位填一填,例下。
Version Name    4.7.1
Bin Path              C:\Qt\4.7.1\bin
Include Path       C:\Qt\4.7.0\include

5. 第一次 build 專案的時候,選擇 db/mi,然後就可以 Run 看看啦。

6. 咦!執行的時候怎麼沒有看到任何視窗跳出來呢,就算是開了一個空的 QtWidget 專案好歹也會跳出一個視窗吧!怎麼就只有在 Console 裡面寫 <terminate> 呢!直接去資料夾點他 build 好的執行檔,也跑出錯誤視窗 "無法找到程序輸入點" @@。


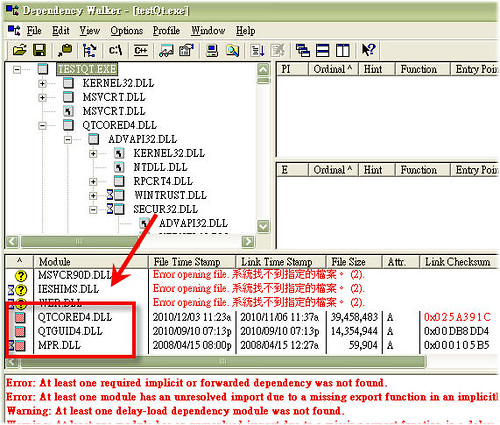
上網搜尋了一下,原來可能是系統路徑當中可能存在衝突的 Qt lib,這時候可以用 Dependency Walker 這個軟體來查看一下 .exe 當需要哪些 .dll。

使用方式很簡單,把你要檢查的 .exe 檔拖曳到 dependency walker 視窗當中,他就會告訴你這個 .exe 檔案跟其他檔案的相依關係。

如下圖結果,看到可疑的 QtCored4.dll 和 QtGuid4.dll,後來系統搜尋了一下才發現,我的 system32 路徑下已經有一個 QtGuid4.dll 了。所以,只要把 C:/Qt/4.7.1/bin 下面的 QtGuid4.dll 複製到執行檔同一個資料夾下,就可以順利跑出視窗囉 :P


Mac 下:乖乖用 Xcode 就好了 :P

…(完)

12/02/2010

Eclipse 使用技巧筆記 - tips


1. Auto-Completion (自動完成)
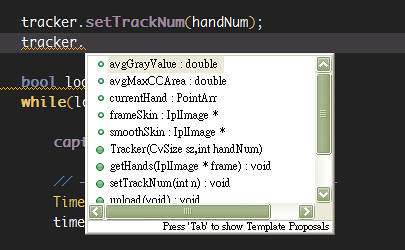
Eclipse 當中也可如同 VS 一般有自動完成 (auto completion) 的功能,預設來說在安裝完成後,針對物件或指標內的成員存取都會有自動彈出列表讓你選擇的功能 (如下圖)。


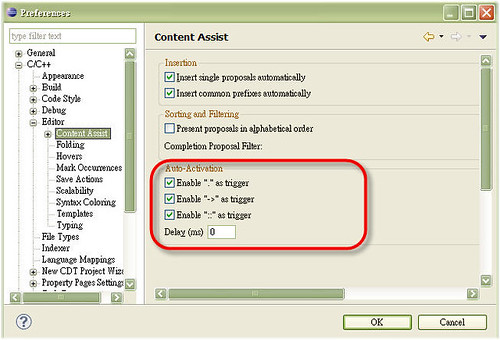
這個功能可以在 Windows –> Preferences –> C/C++ –> Editor –> Content Assist 選項當中設置,一般預設是勾選的,你可以將 delay 的時間調成 0,讓他彈出來快一些!


此外針對一般的變數也可以利用預設的 Alt + / 跳出提示選單,你可以透過更改 key binding 設定來修改這個快速鍵 (雙擊 Shift + Ctrl + L 會跳出 key binding 設定視窗)。

2. Hover to view source (鼠標檢視原始碼)
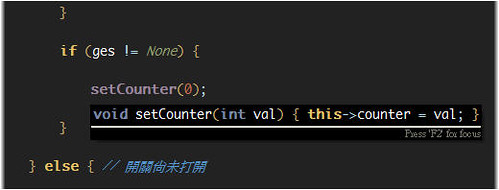
如下圖,Eclipse 還有一個方便的功能,讓你不需要 go to definition 就可以看到某個函數內部的程式碼。按住 Shift 然後將滑鼠移到 setCounter() 函數上頭,就可以看到其內部的程式碼。當然 "Shift" 這個鍵可以修改。


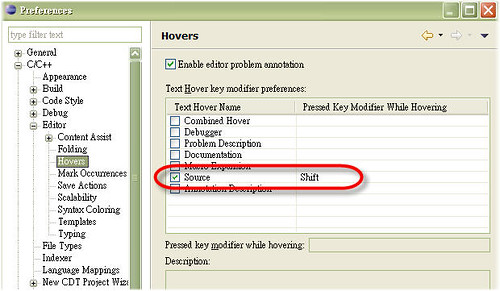
可以在 Windows –> Preferences –> C/C++ –> Editor –> Hovers 當中設定 (如下圖)。或者你也可以利用 F3 (快速跳到函數定義處) 和 Alt + <- (返回),交叉切換檢視函數定義,不過有了 hover view source 會方便一些。


附註:可否修改彈出 source 視窗的背景顏色呢,答案是可以的 (Windows –> Preferences –> C/C++ –> Editor –> 右邊欄位中的 Source hover background 即可設定)

…(持續補充)

Windows 下 Eclipse IDE for C/C++ Developers (Helios SR 1) 安裝與環境配置


1. 安裝 Java Runtiome Environment (JRE)。

2. 下載 Eclipse IDE for C/C++ Developers, 撰文時最新版本為 Helios Service Release 1。基本上只是一個壓縮檔,解壓縮就可以跑了。

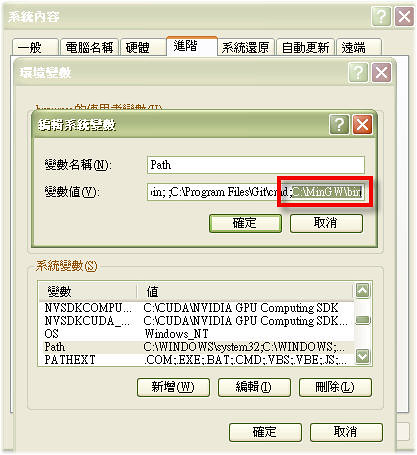
3. 安裝 MinGW (為 Eclipse 提供 GCC, G++編譯器), 撰文時最新版本 mingw-6.8.exe 可以到 http://nuwen.net/mingw.html 下載,照網頁說明安裝即可 (記得要將 ~/MinGW/bin 路徑加到系統環境變數 Path 當中)。


4. 安裝 gdb (因為 MinGW 並沒有提供 gdb 供除錯,需要我們自己下載),撰文時最新版本為 7.2 可以到 http://www.equation.com/servlet/equation.cmd?fa=gdb 下載,或是 http://sourceforge.net/projects/mingw/files/MinGW/BaseSystem/GDB/ 。下載後將 gdb.exe 放置到對應的路徑 (我將 MinGW 安裝在 C://MinGW 所以就將 gdb.exe 放到 C://MinGW/bin 底下)

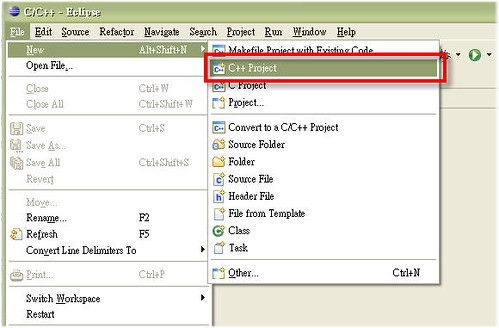
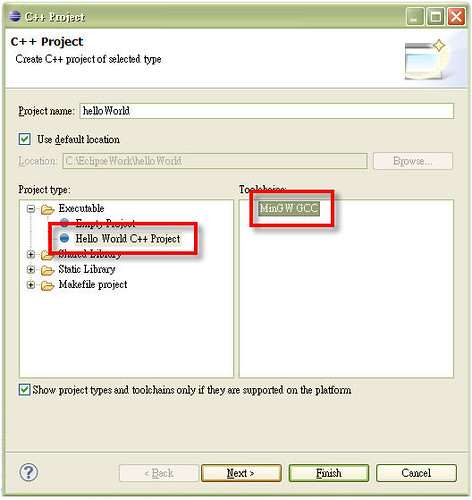
完成上述安裝之後就可以啟動 Eclipse,一開始會要你選定一個 workspace,隨意指定一個你喜歡的路徑即可。然後把歡迎視窗關掉,建立一個新的 C++ 專案。


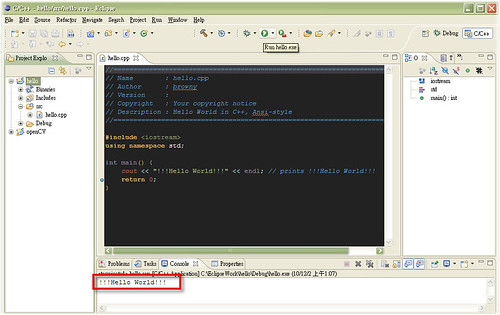
選個 Hello World C++ Project 來測試看看吧!


點一下 Run 按鈕,成功在 console 視窗中出現 !!!Hello World!!! 啦!也可以設個中斷點看看 gdb 是否運作正常 (點擊那個小蟲 (Debug) 按鈕)…


需要比較不傷眼睛的 theme 可以參考這個網址:http://blog.edwards-research.com/2009/11/color-schemes-for-eclipse-cdt-3/。 將下載來的 theme 檔案(例: org.eclipse.ui.editors.prefs, org.eclipse.cdt.ui.prefs) 覆蓋 or 貼上至 [workspace]\.metadata\.plugins\org.eclipse.core.runtime\.settings\ 路徑底下即可。

參考資料:
跳躍的海豚: Eclipse IDE for C/C++ Developers (3.6 Helios)安裝與環境配置

… (完)

11/21/2010

讓 vim 的 class 和 function 也有語法高亮度 (syntax highlight)

1. 建立檔案 ~/.vim/syntax/c.vim

2. 在 c.vim 當中加入

" Highlight Class and Function names
syn match    cCustomParen    "(" contains=cParen
syn match    cCustomFunc     "\w\+\s*(" contains=cCustomParen
syn match    cCustomScope    "::"
syn match    cCustomClass    "\w\+\s*::" contains=cCustomScope


hi cCustomFunc guifg=yellowgreen
hi cCustomClass guifg=#00FF00

3. 重新啟動 vim

參考資料:
1. class & function names highlighting in Vim - Stack Overflow

...

幫 vim 加上 NERDtree 檔案系統瀏覽功能

一般 IDE 都會有一個類似檔案總館的樹狀資料結構,vim 也可以透過 NERDTree 這個 plugin 達成!

1. 下載 NERDTree

2. 解壓縮至 ~/.vim 資料夾當中,將對應的檔案放到對應的資料夾底下,沒有該資料夾則自行創建

3. 重新啟動 vim

一些使用的技巧如下:

1. 使用 :NERDTreeToggle 開啟/關閉 NERDTree 視窗,也可以設定對應的快速鍵來達成
map :NERDTreeToggle

2. 用 Ctrl + ww 來切換 NERDTree 和原始碼視窗

3. 在 NERDTree 當中用 t 使用新分頁開啟檔案並跳轉過去,使用 T 新分頁開啟檔案但不跳轉過去

其他:

Press i to open the file in a new horizontal split.
Press s to open the file in a new vertical split.
Press p to go to parent directory.
Press r to refresh the current directory.

參考資料
Command Center: Vim Plugins You Should Know About: NERDTree

...

11/19/2010

幫 vim 加上 C++ code completion 功能

IDE 的自動補完功能是非常方便的,如何讓 vim 也有類似 IDE 那般方便的 auto-completion 呢。以下記錄實作的方式。

1. 在 ~/.vim 下建立資料夾 tags

2. 建立 stdc++ tags, 下載並解壓縮 modified libstdc++ headers 到 ~/.vim/tags/cpp_src

3. 建立 ctags 吧
--c++-kinds=+pl : 為C++文件增加函數原型的標籤, 添加 l 讓局部變數也能自動補完
--fields=+iaS : 在標籤文件中加入繼承信息(i)、類成員的訪問控制信息(a)、以及函數的指紋(S)
--extra=+q : 為標籤增加類修飾符。注意,如果沒有此選項,將不能對類成員補全

$ cd ~/.vim/tags
$ ctags -R --sort=1 --c++-kinds=+pl --fields=+iaS --extra=+q --language-force=C++ -f cpp cpp_src 

如果你想要針對特定使用之函式庫也能有自動補完功能,那麼也需要針對該函式庫建立相對應的 tag 檔案,舉 Qt4 為例 (只針對 QtCore 的部份建立 tags):

$ cd ~/.vim/tags
$ ctags -R --sort=1 --c++-kinds=+pl --fields=+iaS --extra=+q --language-force=C++ -f qt4Core /Library/Frameworks/QtCore.framework/Headers


4. 編輯你的 ~/.vimrc 檔案

" configure tags - add additional tags here or comment out not-used ones
set tags+=~/.vim/tags/cpp
set tags+=~/.vim/tags/qt4Core


" build tags of your own project with Ctrl-L
map <C-L> :!ctags -R --sort=yes --c  -kinds= p --fields= iaS --extra= q .<CR>


" OmniCppComplete
let OmniCpp_NamespaceSearch = 1
let OmniCpp_GlobalScopeSearch = 1
let OmniCpp_ShowAccess = 1
let OmniCpp_ShowPrototypeInAbbr = 1 " show function parameters
let OmniCpp_MayCompleteDot = 1 " autocomplete after .
let OmniCpp_MayCompleteArrow = 1 " autocomplete after ->
let OmniCpp_MayCompleteScope = 1 " autocomplete after ::
let OmniCpp_DefaultNamespaces = ["std", "_GLIBCXX_STD"]
" automatically open and close the popup menu / preview window
au CursorMovedI,InsertLeave * if pumvisible() == 0|silent! pclose|endif
set completeopt=menuone,menu,longest,preview

5. 然後就可以開始使用啦,新增局部變數的時候記得 更新一下 tags 檔案,就可以 選擇要自動補完的函數或變數囉!

參考資料
1. C++ code completion - Vim Tips Wiki
2. Vim and Ctags tips and tricks - Stack Overflow

3.  The Only Winning Move » Code Completion for Qt4 in Vim - Mac OS X Version

...

11/18/2010

為 MacVim 裝上 taglist 套件

vim 是一個強大的文字編輯器,使用 taglist 套件,我們可以概覽程式碼的結構並在各個原始碼文件中跳轉瀏覽,非常方便!

Tag List 插件需要 Ctags 這個程序的支持,然而,系統自帶的 Ctags 功能比較簡單,支持的語言也少(如不支持 C++、Java 等語言),所以推薦安裝更強大的 Exuberant Ctags

首先到官方網站下載 Exuberant Ctags 的源代碼,最新版本是5.8。

接著解壓到本地並進入文件夾,確保你的 Mac 上面已經安裝了 XCode 之後,就可以開始編譯安裝 Exuberant Ctags:

./configure
make
sudo make install


Exuberant Ctags 就會被安裝在 /usr/local/ 目錄下了,但是由於系統中原先已經內置了Ctags,如果沒有將 /usr/local/bin 添加到系統路徑中的話,默認執行的是 /usr/bin/ctags,可以在命令行中執行:

which ctags

如果返回的不是 /usr/local/bin/ctags,那麼需要修改一下環境變數

echo $PATH 可以印出現在的 PATH 設定。

$ sudo vi /etc/paths 則可以編輯 PATH 設定,將 usr/local/bin 移至 usr/bin 前方,儲存後重開 Terminal。

接著再檢查一次 which ctags 是不是返回 /usr/local/bin/ctags,是的話就正確了。

Exuberant Ctags 安裝完畢之後就可以安裝 Tag List 插件了,在官方網站上下載 Tag List 然後解壓,將 plugin 文件夾中的 taglist.vim 復制到 ~/.vim/plugin/ 中,將 doc 文件夾中的 taglist.txt 復制到 ~/.vim/doc/ 中,如果~目錄下沒有對應的文件夾請自行創建。

最後,處理 Tag List 的幫助文件,先命令行進入 ~/.vim/doc 文件夾,然後啟動 Vim,在 Vim 中執行(注意命令中的 .)

:helptags .

注意:

1. This plugin relies on the Vim "filetype" detection mechanism to determine the type of the current file. You have to turn on the Vim filetype detection by adding the following line to your .vimrc file:

filetype on

2. You can now use the ":TlistToggle" command (previously ":Tlist") to open/close the taglist window. You can use the ":help taglist" command to get more information about using the taglist plugin.

參考資料:

1. Vim Taglist plugin installation: http://vim-taglist.sourceforge.net/installation.html
2. 安裝Exuberant Ctags及Tag List插件: http://aug6th.com/blog/?p=12/

使用方法:

1. Terminal 到你要瀏覽的專案資料夾目錄下,輸入

ctags -R 建立 tag 標籤檔

2. 用 MacVim 開啟一原始檔,並且下

:TlistToggle 開啟 taglist


11/17/2010

Qt 在 mac 下用 g++ compile

將程式寫好之後 在路徑下

1. qmake -project : 產生 .pro 檔案

2. mac {
        CONFIG -= app_bundle
    }
    
不要 Makefile 創建 app bundle
    
3. 直接 qmake 會產生 Xcode project, qmake -spec macx-g++ 則會生成一個 makefile

4. make 輸出執行檔

參考資料:How to compile a simple Qt and c++ application using g++ on mac os x?

...

11/14/2010

iPhone Human Interface Guidelines Notes (2, 3 chapters)

Chap2. Creating a Great User Interface

基於實現方式 iOS 可將軟體分為三類:iPhone Application, Web-only content, Hybrid application

三種 Application Styles:
1. Productivity 2. Utility 3. Immersive

學習不同的 application style 經常心存下列疑問
1. user用這個app的動機
2. user使用這個app的體驗
3. app的焦點和主要目標
4. app如何組織和顯示使用這關心的資訊

記住人們在使用iOS device的時候通常一邊在走路, 並且周遭的環境非常容易使人分心

運用80/20法則決定應該要有哪些功能, 只做那些絕大部分的人需要的功能

好的介面設計並非基於device的能力, 而是基於使用者如何思考和運作你的app

隱喻:如果可以, 讓app的操作盡量符合真實世界的物件或行為

直接處理:使用者可以直接感受到控制的東西是tangible, 而非abstract
1. 當user執行動作時, 物件依然是可見的
2. 而且結果可以直接讓user感受到

美學整合並不是好看就好, 而是評估外表和功能之間的一致性

Chap3. From Product Definition to Branding

建構一個產品定義描述(product definition statement)
首先你要先了解目標客戶族群, 將你想要傳達的功能和目標客戶族群放在腦中, 試著將這些功能列表轉換成一句描述

產品定義描述:描述產品提供的解決方案以及其目標客戶群

學習典範app的特性

# 簡化和易用性
1. 主要的功能要立即且明顯(可以在一開始使用最少的按鈕和明顯的label說明,讓使用者一目了然)
2. 將經常使用、高階的資訊置放於螢幕頂端(考慮手指操作, 拇指最容易觸擊的地方就是螢幕頂端)
3. 縮短使用者輸入的長度(當使用者持需輸入而看不到任何進展是令人挫敗的, 盡量縮短讓使用者輸入的過程, 或者是切分他們, 讓使用者可以看到每一步輸入都有些許的進展)
4. 簡短的表達資訊
5. 提供手指大小的target

# 專注於主要task
謹記產品定義描述, 當你決定什麼資訊要顯示在螢幕上的時候問自己, 使用者當下非常需要這個資訊或功能嗎?

# 溝通效率
使用者時時都要知道自己的動作是否有被處理或者造成什麼錯誤, 但是無謂的互動會造成厭煩. 站在使用者的立場使用他們懂得詞彙, 避免專業術語.

# 適當的支援手勢
盡量使用最簡單易懂的tap和drag, 利用使用者已經習慣內建的手勢語意, 來提升app一致的操作體驗

...

10/27/2010

Qt 環境建構指南 - environment setting

最近對於跨平台 GUI 有些興趣,於是就找了 Qt 來玩玩,希望可以做出橫跨 Windows, Linux 和 Mac 的跨平台程式。

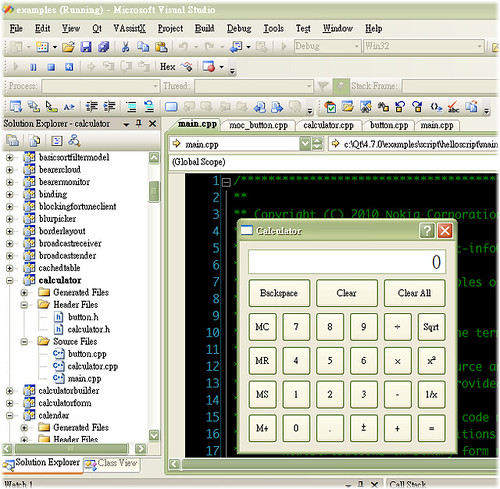
記錄一下 Windows 下的 Qt 環境建置,其實 Qt 的官方網站已經提供許多簡單的安裝包,除了使用開源的 GCC compiler 以外,假如有安裝 VS2008 的話,也可以直接下載 「Qt libraries 4.7.0 for Windows (VS 2008, 226 MB)」。

安裝完以後,預設的路徑是在 「C:\Qt\4.7.0\」,當中已經包含預先建置好的範例專案,以及執行檔。直接進入「C:\Qt\4.7.0\examples」探索他的範例程式。在此之前要先手動設定好「環境變數」。

進入 Windows 的環境變數設定,並且在 PATH 當中加入 「C:\Qt\4.7.0\bin;」,注意:不同路徑之間以分號隔開,並且不能多加空格!設到好之後,可以選一個 project 來試跑看看,例如:calculator 專案。


另外,Qt 也提供了 Visual Studio Add-in,安裝之後,VS 當中就會新增建置 Qt 專案的選項,有一些預先提供的 project template 可供使用。

...

10/26/2010

封裝 openCV 事件成物件的方法成員 - event encapsulation

在使用 openCV 提供的 highgui 時,其提供了一個簡單的滑鼠鍵盤事件機制,透過 cvSetMouseCallback 將 on_mouse 事件綁定到 window_name 視窗。


CVAPI(void) cvSetMouseCallback( const char* window_name, CvMouseCallback on_mousevoid* param CV_DEFAULT(NULL));


一旦 window_name 視窗發生動作就會驅動 on_mouse 事件方法,但是這個 on_mouse 方法不能是類別的方法成員 ( 例:object->on_mouse ),嘗試後發現,可以利用函數指標將 on_mouse 方法 assign 成 object 的函數指標成員,這樣就可以成功的將事件方法封裝到類別之中。


// ctrl.h

typedef void (*pFun)(int, int, int, int, void*);

class Controller {
public:
  Controller();

  pFun pFun1;
};


// ctrl.cpp

#include <iostream>
#include <highgui.h>
#include "ctrl.h"

void on_mouse( int event, int x, int y, int flags, void *param )
{   
  if( event == CV_EVENT_LBUTTONDOWN )
    std::cout << "LBUTTONDOWN  occurs in the window" << std::endl
}

Controller::Controller()
{
  pFun1 = &on_mouse;
}


// main.cpp

#include <highgui.h>
#include "ctrl.h"

int main()
{

  Controller controller;

  cvNamedWindow("src", 1);
  cvSetMouseCallback( "src", controller.pFun1, 0 );

  while(1) {
    int c = cvWaitKey(30);
    if ( (char)c == 27 ) {
      cvDestroyWindow( "src" );     
      break;     
    }
  }
}


實作之後發現,此法依舊行不通,單純的函式指標 (如上) ok。但是,成員函式指標 依然無法 work,最後的解決辦法是將 on_mouse 變成一個 cpp 的全域變數,然後再用 friend 使其可以存取類別的私有成員...

...

10/12/2010

用 Google Code 作專案的版本控制

Google Code 上頭除了有許多 open source project 可以挖寶,它也是一個免費的專案 hosting 和版本控制的好工具!


參考資料:

如何將資料夾移除版本控制:http://tortoisesvn.net/node/343
TortoiseSVN 使用簡介:http://www.dev.idv.tw/mediawiki/index.php/TortoiseSVN 使用簡介

......

10/02/2010

[iPhone] 了解 PhotoPicker 當中的委派機制

最近想要實作一個 iPhone 手機上的照相軟體,因此稍微研究了一下有關 camera 相關的資料。首先 iPhone 當中處理 camera 的主要是 UIImagePickerController 這個 class。利用 UIImagePickerControllerDelegate 和 UIImagePickerController 就可以開始處理/控制 iPhone 的 camera 和 photo library。

在 Beginning iPhone3 Development 書中,關於 Camera 的章節範例,主要是以 UIViewerController 下的 ModalView ( - (void)presentModalViewController:(UIViewController *)modalViewController animated:(BOOL)animated ) 模式來呈現擷取到的照片,這個模式下的照片並非全螢幕,仍保留一些 Nav Bar 或者 Tool Bar,跟一般看到的 app 可以在拍照完以後在全螢幕模式下編輯不太一樣。

在 Apple Developer 網站當中有一個 PhotoPicker 的範例,主要就是在演示,如何不使用 ModalView 的方式取得 camera 所拍攝到的原始影像,在將這個影像填入你要呈現的 View 當中。

該範例當中宣告了兩個 ViewController:MyViewController 和 OverlayViewController,前者主要就是客製化的 View 想要用來避開 ModalView 模式的方式。後者的 .h 如下程式碼宣告,這個 class 當中包含了一個 UIImageViewController 並且還有一個 遵守 OverlayViewControllerDelegate 協定的成員 "delegate"。

@protocol OverlayViewControllerDelegate;

@interface OverlayViewController : UIViewController <UINavigationControllerDelegate, 
UIImagePickerControllerDelegate>
{
    id <OverlayViewControllerDelegate> delegate;
    
    UIImagePickerController *imagePickerController;
    
@private
    ...
}    

@property (nonatomic, assign) id <OverlayViewControllerDelegate> delegate;
@property (nonatomic, retain) UIImagePickerController *imagePickerController;

...

@end

@protocol OverlayViewControllerDelegate
- (void)didTakePicture:(UIImage *)picture;
- (void)didFinishWithCamera;
@end


可以看到這個 OverlayViewControllerDelegate 當中列出了兩個必要實現的方法 didTakePicture 和 didFinishWithCamera。這兩個方法的名稱看起來像是系統發出的事件,但是先前提到,有關照相相關的任務主要是以 UIImagePickerController 這個 class 所控制,所以來看看 OverlayViewControllerDelegate 的 .m 檔。

#pragma mark -
#pragma mark UIImagePickerControllerDelegate

// this get called when an image has been chosen from the library or taken from the camera
//
- (void)imagePickerController:(UIImagePickerController *)picker didFinishPickingMediaWithInfo:(NSDictionary *)info
{
    UIImage *image = [info valueForKey:UIImagePickerControllerOriginalImage];
    
    // give the taken picture to our delegate
    if (self.delegate)
        [self.delegate didTakePicture:image];
    
    if (![self.cameraTimer isValid])
        [self finishAndUpdate];
}

- (void)imagePickerControllerDidCancel:(UIImagePickerController *)picker
{
    [self.delegate didFinishWithCamera];    // tell our delegate we are finished with the picker
}

@end

可以看到在實現 UIImagePickerControllerDellegate 的兩個方法當中,偷偷地把事件和影像的資訊 委派給 OverlayViewControllerDelegate protocol 的方法,那麼誰負責做這個 protocol 當中描述的這兩件事呢,答案就是 MyViewController!

- (void)viewDidLoad
{
    self.overlayViewController =
        [[[OverlayViewController alloc] initWithNibName:@"OverlayViewController" bundle:nil] autorelease];

    // as a delegate we will be notified when pictures are taken and when to dismiss the image picker
    self.overlayViewController.delegate = self;
    
    self.capturedImages = [NSMutableArray array];

    if (![UIImagePickerController isSourceTypeAvailable:UIImagePickerControllerSourceTypeCamera])
    {
        // camera is not on this device, don't show the camera button
        NSMutableArray *toolbarItems = [NSMutableArray arrayWithCapacity:self.myToolbar.items.count];
        [toolbarItems addObjectsFromArray:self.myToolbar.items];
        [toolbarItems removeObjectAtIndex:2];
        [self.myToolbar setItems:toolbarItems animated:NO];
    }
}


// as a delegate we are being told a picture was taken
- (void)didTakePicture:(UIImage *)picture
{
    [self.capturedImages addObject:picture];
}

// as a delegate we are told to finished with the camera
- (void)didFinishWithCamera
{
    [self dismissModalViewControllerAnimated:YES];
    
    if ([self.capturedImages count] > 0)
    {
        if ([self.capturedImages count] == 1)
        {
            // we took a single shot
            [self.imageView setImage:[self.capturedImages objectAtIndex:0]];
        }
        else
        {
            // we took multiple shots, use the list of images for animation
            self.imageView.animationImages = self.capturedImages;
            
            if (self.capturedImages.count > 0)
                // we are done with the image list until next time
                [self.capturedImages removeAllObjects];  
            
            self.imageView.animationDuration = 5.0;    // show each captured photo for 5 seconds
            self.imageView.animationRepeatCount = 0;   // animate forever (show all photos)
            self.imageView.startAnimating;
        }
    }
}


上面 MyViewController 實現碼當中可以看到,他包含了一個 OverlayViewController 物件,並且他將該物件的代理設定為 "自己" ( self.overlayViewController.delegate = self; ),最後他實現了這個 OverlayViewControllerDelegate 這 protocol 的兩個方法,將 UIImagePickerController 得到的影像資料神奇的存到自己的成員 capturedImages 當中。

簡而言之,OverlayViewController 將 UIImagePickerControllerDelegate 和 UIImagePickerController 包裝起來,所以富有預設的圖片顯示功能,但是他並沒有用 Modal 的方式,而是將他取得的照片,傳給自己的 delegate 成員。而 MyViewController 有一個 OverlayController 成員,又將自己指向 OverlayController 的 delegate 成員。因此等效於 UIImagePickerController 把取得的照片傳給 MyViewController。

......

9/27/2010

Xcode 好用快速鍵備忘

記錄幾個好用且常用的 Xcode 快速鍵

1. 註解/反註解: Cmd + /
選取一段你要 註解/反註解 的程式碼,按下 Cmd + / 即可。類似 VS 的 (Ctrl + K + C, Ctrl + K +U)

2. 新增/移除中斷點: Cmd + \

3. 打開 API 文件: Option + 左鍵雙擊

4. 跳到函式定義處: Cmd + 左鍵雙擊

5. Indent / Un-Indent:Cmd + ] / Cmd + [

6. 放大縮小 Editor 視窗:Shift + Cmd + E

7. 跳轉 .h 和 .m 檔: Cmd + Option + ↑

8. 刪除一行:Ctrl + D

9. 自定義快速鍵:Xcode -> Preferences -> Key Bindings (終極秘技)

參考網頁:
Xcode shortcut list at Labs
http://labs.grupow.com/index.php/2010/12/xcode-shortcut-list/

XCode 常用快捷键 | Elton's Blog
http://blog.prosight.me/index.php/2009/06/146


......

9/26/2010

[C++] 利用函數指標(funtion pointer)實現委派機制(delegate)

這篇文章記錄一下函數指標如何使用 以及 在委派機制上的實現方式。

所謂函數指標,顧名思義就是一個指向函數的指標,看起來他的用途似乎像是要把函數拿來傳遞用,也就是說可以把一個函數指標當做參數丟進另一個函數。

如下程式碼所示,有一個輸出 bool,輸入 int 的函式叫做 action,如果我們希望將他傳遞到 test 當中,然後再由 test 決定該 action 的輸入參數,這時候函數指標就派上用場了!

#include <iostream>
using namespace std;

bool action(int i) {
    cout << "action: " << i << endl;
    return 0;
}

// define pFun is a function pointer of (out: bool in: int)
typedef bool (*pFun)(int); 

void test(pFun p1, int i) {
    (*p1)(i);
}

int main() { 
    test(&action, 1);
    return 0;
}

除此之外由於 C++ 沒有所謂的委派,而函數指標另外一個最大的功用就拿來實現委派。當有兩個物件彼此之間需要溝通 (例:A 物件的某個 A-1 方法需要觀察 B 物件的 B-1 欄位來決定其行為),這時候就可以幫 B 物件建立一個委派,這個委派不斷的觀察 B 物件的狀態,然後告訴 A 物件要做怎樣的行動。

如下程式碼,有一個 Subject 物件和 Observer 物件,當 Subject 物件當中的 somethingHappen 方法啟動的時候 (可以把它想做一個事件),就會引發 Observer 物件當中的 action 函式!

#include <iostream>
using namespace std;

class Observer {
public:
 
 bool action(int p);
 
};

bool Observer::action(int p) {
 
 std::cout << "print by member function pointer" << std::endl;
 
 return true;
}

class Subject {
 
public:
 
 bool (Observer::*memberFunPtr)(int); // member function pointer
 Observer* m_observer;
 
 void attach (Observer* observer);
 void somethingHappen();
 
 
};

void Subject::attach (Observer* observer) {
 m_observer = observer;
 memberFunPtr = &Observer::action;
}

void Subject::somethingHappen() {
 ((m_observer)->*(memberFunPtr))(1);
}


int main() 
{ 
 Subject mySubject;
 Observer myObserver;
 
 mySubject.attach(&myObserver);
 
 mySubject.somethingHappen();
 
    return 0; 
} 

截至目前為止我對於 Delegate 的理解大概是,他不是什麼特別的語法,只是一種概念。沒有這種機制的話,兩個物件彼此間要溝通,或是互相修改彼此的成員變數,會利用 composition 的方式實現 (也就是在A物件當中包含有B物件,B物件當中包含有A物件)。

透過函數指標,可以降低物件之間的耦合程度,例:原本你想用 B 物件的 B-1 方法修改 A 物件的 private 成員 A-1,那麼勢必要將 A 物件傳入 B-1 方法,甚至還要將 A-1 成員改成 public 才有辦法讓 B-1 存取;如果使用委派,則可以設定一個 A-2 方法取代 B-1 方法,並將 A-2 方法以函數指標傳進 B-1 方法當中 (連帶要將 A 物件的參考傳進去),需要的時候在由 B-1 引發 A-2 函數,也不需要修改 A-1 成員的屬性。

其實我也還不是很懂,或許未來實作上有遇到在來補充一下好了!參考資料有許多精闢的使用範例,搭配泛型甚至可以做到和 C# 當中 Delegate 一樣的效果!

參考資料:
- 函式指標的用途
- What are the advantages of delegates?
- Member Function Pointers and the Fastest Possible C++ Delegates
- Generic Observer Pattern and Events in C++
- Passing member function pointer to member object in c++

......

9/25/2010

[emacs] Emacs 新手第一章

Mac Terminal 下也有安裝 emacs,只要下 emacs 指令就可以了,但是如果需要比較視覺化的介面可以安裝 Carbon Emacs Package

切換 buffers : C-x + 左右鍵
開新檔案:C-x C-f
關閉檔案, 關閉buffers:C-x k (先按 Ctrl+x,然後再按 k)
儲存檔案:C-x C-s
插入檔案:C-x i
另存新檔:C-x C-w
打開檔案並取代當前buffer:C-x C-v
離開 Emacs:C-x C-c

查詢某指令:C-h k 然後輸入你要查詢的指令 ( 例:C-x i )

如果你想要 disable Emacs 的自動備份存檔功能,那麼可以打開 .emacs 檔案 ( C-x C-f ~/.emacs ) 然後加入以下指令:

;disable backup
(setq backup-inhibited t)
;disable auto save
(setq auto-save-default nil)

9/24/2010

iPhone App 的基本流程

在開始寫 iPhone App 之前,對於 iPhone 程式整個的流程應該要有一個大致上的了解,不像之前在寫 C++ 程式一樣,iPhone 採用了 MVC, delegate 等等設計模式,那些新增專案自動產生出來的程式碼,似乎不是那麼容易讓人理解,於是我潛心鑽研了兩小時,在此記錄一下。


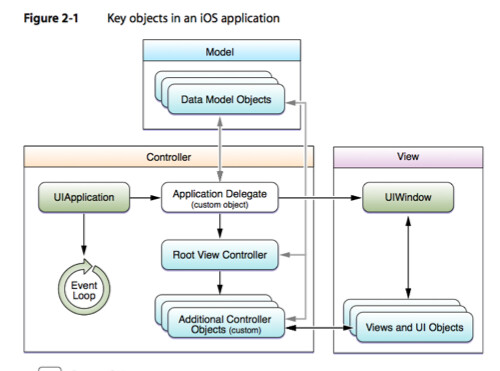
上面這張圖是擷取自 iOS Application Programming Guide,大概可以說明整個 App 是如何開始運作的。可以開一個 View-based Application 來對照看看上面這張圖是怎麼回事。

說到程式的進入點,第一個想到的就是 main function,當然 iPhone 程式也不例外,可以在 Group &Files 當中的 Other Sources 找到 main.m 這個檔案,當中定義了 main 函式如下:

int main(int argc, char *argv[]) {
   
    NSAutoreleasePool * pool = [[NSAutoreleasePool alloc] init];
    int retVal = UIApplicationMain(argc, argv, nil, nil);
    [pool release];
    return retVal;
}


首先他建立了一個記憶體管理的 pool 這個先不用管他,重點是第二行 UIApplicationMain,是的,這個函式我將他理解成 UIApplication 的建立,也就是整個 iPhone App 開天闢地的天下第一 funciton。接著,由上方的流程圖可以看到,下一部就是連結 Application Delegate

但是,其實這個動作,當我們使用專案範本建立新專案的時候,Xcode 就幫我們做好了,假設你建立了一個名為 VB 的 View-based Application,那麼你可以看到兩個 delegate 檔案已經自動被建立好了 (VBAppDelegate.h 和 VBAppDelegate.m)。

打開 VBAppDelegate.h 來瞧瞧可以看到他的 interface 定義了兩個成員 (如下),一個是 UIWindow 另一個則是 VBViewController。可以看到 VBAppDelegate 其實是 conform 了 <UIApplicationDelegate> protocol,也就是說他是一個 custom object,請參照上圖,也就是說設計者可以新增一些任務在當中。

@interface VBAppDelegate : NSObject <UIApplicationDelegate> {
    UIWindow *window;
    VBViewController *viewController;
}


既然他叫做 AppDelegate,也就是說當 UIApplication 開始之後,會交代一些事情給 AppDelegate 去做,而 AppDelegate 所要做的最基本的事情就是建立一個 window 然後把一個空的 view 放進去 (就 View-based Application 而言)。

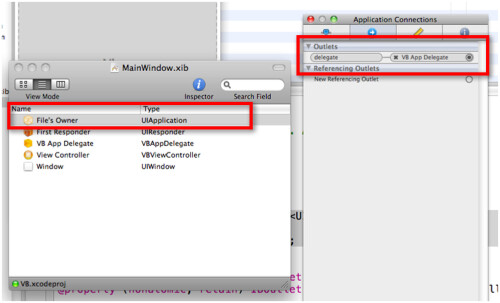
那麼,UIApplication 是怎麼告訴 UIApplication Delegate 要做事了呢,打開 Group & Files 當中 Resources 裡面的 MainWindow.xib 變可一窺究竟。.xib 稱之為 nib 檔,是用來描述 Application 的外表與其控制物件關係的檔案 (是以視覺化的方式呈現),總之,雙擊 MainWindow.xib 來瞧瞧,如下:


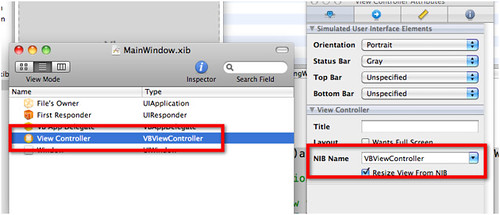
選取 File's Owner 可以看到,原來這個 nib 檔案的擁有者是 UIApplication,然後觀察他的連結部分,可以看到 UIApplication 有一個 Outlet 叫做 delegate,而且已經被 link 到 VBAppDelegate,是的,一切都是範本幫你建好好的,有了這個連結 UIApplication 就會在某個適當的時機將任務交派給 Application Delegate 去做。

接著看看 VBAppDelegate 做了哪些事,點選 VB App Delegate 看看他的連結狀況 (如下圖),可以看到它的兩個 Outlet 成員 viewController 和 window 都已經被範本幫你建立好的 View Controller 和 Window 元件給連上了。


稍微回顧整理一下,UIApplication 出現,然後叫 Application Delegate 做事,然後它建立了一個 window 和一個 view controller 並且把這個 view 丟到 window 當中,觀察 VBAppDelegate 的 application:didFinishLaunchingWithOptions: 函式可以得知!

- (BOOL)application:(UIApplication *)application didFinishLaunchingWithOptions:(NSDictionary *)launchOptions {   
   
    // Override point for customization after application launch.

    // Add the view controller's view to the window and display.
    [window addSubview:viewController.view];
    [window makeKeyAndVisible];

    return YES;
}


接著我們看看 View Controller 的連結狀況 (如下圖),咦,怎麼只有看到他被連結到 Application Delegate,它本身的 view Outlet 沒有被連結,空空如也呢?


Oh, 原來他是透過 NIB Name 將這個 View Controller 物件以另一個 nib 檔案來初始化,如下圖:


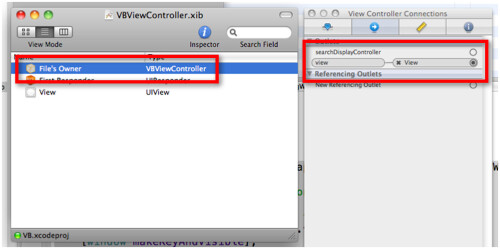
那麼,只要打開 VBViewController.xib 一切就水落石出啦,的確在這個 nib 檔案當中,View Controller 的成員 view (也是 outlet) 的確連結到一個空的 View 物件,真相大白!


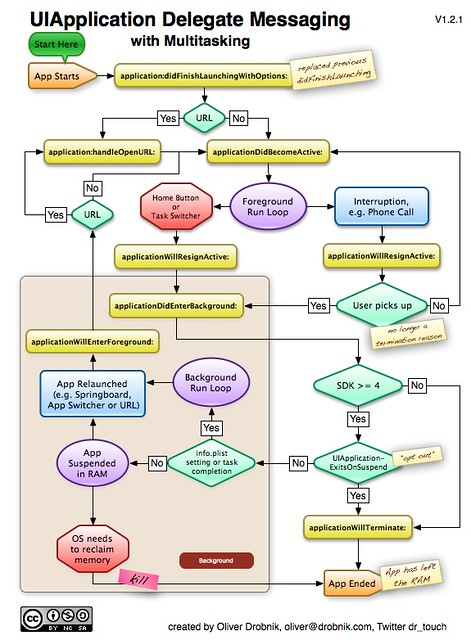
以上大致就是透過專案範本所產生出來的現成程式碼所在做的事情,當然 App 在運行的途中可能會遭遇到許多的狀況,一個完整的運行流程在 這篇 文章中有詳細的圖解!引用該圖如下:


參考資料:Demystifying iPhone App Startup, Demystifying View Controllers and Views

......


9/23/2010

在 iPhone 程式開發當中使用 OpenCV


本篇記錄如何使用 Xcode 開發 iPhone App 的時候可以使用 OpenCV 進行影像處理。

首先,要先下載網路上熱心的人已經製作好的 static library: http://niw.at/articles/2009/03/14/using-opencv-on-iphone/en

下載回來解壓縮之後可以看到兩個資料夾,opencv_device 和 opencv_simulator 這當中有需要用到的 header 和 lib 檔案。

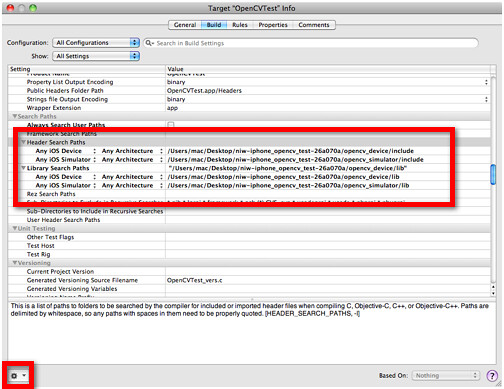
接著,在建立專案的時候,編輯 Group & Files 當中打開 Target 項目。雙擊其子項目則會跳出 Target "專案名稱" Info 的視窗,找到其中的 Search Paths 欄位,其中有 Header Search Paths 和 Library Search Paths 兩個項目需要設定。

由於針對 device 和 simulator 有不一樣的 lib 對應,所以分成兩組,因此選取 Header Search Paths 之後點擊左下角的功能選單,選擇 Add Build Setting Confition,然後分成兩組 Any iOS device 和 Any iOS simulator,針對這兩組在添加對應的 header 和 lib 路徑。( 附註. ${SOURCE_ROOT} 是專案資料夾路徑的縮寫, 並注意路徑當中最好不要有空格,否則會出現找不到 <opencv/cv.h> 的錯誤)


接著,要在 Linking 的欄位當中找到 Other Linker Flags 並且加入 -lstdc++-lz 兩個項目。

最後,滑鼠選取專案,然後按右鍵 Add -> Add Group 然後新增一個名為 Library 的 Group,然後選取它,到主選單裡面的 Project -> Add to Project,會跳出一個選取視窗,這時候就找到 device 資料夾底下 lib 資料夾的 libcv.a, libcxcore.a, libopencv_lapack.a 三個檔案並且加入,就大功告成了!

如果是要在 MacOSX 下建立 OpenCV 環境的話可以參考:http://opencv.willowgarage.com/wiki/Mac_OS_X_OpenCV_Port。基本上使用 MacPorts 蠻簡單的!

參考資料:How to add multiple static library files with different architectures to Xcode

......


9/16/2010

[C++] 成員函式對私有成員的存取權限是 type-wise 不是 object-wise

如下 main 所示,宣告兩個 OneNumber 物件 aa 和 bb,並呼叫 aa 當中的 sumWithAnother 方法。可以看到 sumWithAnother 這個成員函式對於 bb 這個非 aa 物件,是有權力存取該私有成員變數 _num 的!

#include <iostream>

using namespace std;


class OneNumber

{

private:

  int _num;


public:

  OneNumber(int x); 

  int sumWithAnother(OneNumber n);

};


int main()

{

  OneNumber aa(2);

  OneNumber bb(8);

  int sum = aa.sumWithAnother(bb);

  cout << "sum: " << sum << endl;


}


OneNumber::OneNumber(int x) : _num(x) {}

int OneNumber::sumWithAnother(OneNumber n)

{

  return (_num + n._num);

}


...

9/15/2010

[C++] Pass vector which is not allowed to change to a funciton by constant reference

如下程式碼所述,使用 const 是一個好的習慣,在可讀性上可以明確的表示某變數不為更動,針對成員函式宣告 const 也可以表明該成員函式不會更動到所屬物件的資料成員。

那麼當要傳遞 vector 類型的資料到函數當中要怎麼利用 const 呢,這邊要注意的事如果你在函式當中使用 iterator 操作了該 vector 的話,就會造成 cannot convert from 'std::_Vector_const_iterator<_Ty,_Alloc>' to 'std::_Vector_iterator<_Ty,_Alloc>' 類似的錯誤。

原因就是容器當中若你要使用不更動容器內容的 iterator,應該要改用 const_iterator,所以只要把 iterator 改成 const_iterator 就可以利用 const & by reference 的方式把 vector 傳進函式當中並且確保他不會被更動!


#include <vector>
using namespace std;

int sumOfVector(const vector<int> &vec)
{
  int sum = 0;

  //typedef vector<int>::iterator intVect; // Error
  typedef vector<int>::const_iterator intVect; // Good!

  intVect itBegin = vec.begin();
  intVect itEnd   = vec.end(); 

  for (intVect it = itBegin; it != itEnd; it++)
    sum += *it;

  return sum;

}

int main()
{
  vector<int> vec(10, 1);
  int sum = sumOfVector(vec);

  return 1;

}

...

9/14/2010

[Tool] Visual C++ 記憶體洩漏偵測工具

Visual Leak Detector - Enhanced Memory Leak Detection for Visual C++

使用方式:

1. 下載 Visual Leak Detector
2. Copy the VLD library (*.lib) files to your Visual C++ installation's "lib" subdirectory.
3. Copy the VLD header files (vld.h and vldapi.h) to your Visual C++ installation's "include" subdirectory.
4. In the source file containing your program's main entry point, include the vld.h header file. It's best, but not absolutely required, to include this header before any other header files, except for stdafx.h. If the source file, include stdafx.h, then vld.h should be included after it.
5. If you are running Windows 2000 or earlier, then you will need to copy dbghelp.dll to the directory where the executable being debugged resides.
6. Build the debug version of your project.

完成之後,在 Debug 模式下執行程式,程式執行完畢後,Output 視窗會顯示是否偵測到 Memory Leak 的訊息,以及發生的位置。雙擊可以跳到該處。

......

9/06/2010

[轉] 程式設計語錄

一個好的程式設計師,就是那種就算只是要穿越單行道,也會看看兩邊再走的人。
A good programmer is someone who looks both ways before crossing a one-way street.
-- Doug Linder, 系統管理員


任何工具最重要、但也是最難以最到的一步,就是他對於使用者習慣的影響。
如果這個工具是程式語言,那不管我們是否願意,他都會影響我們的思考習慣。
A most important, but also most elusive, aspect of any tool is its influence on the habits of those who train themselves in its use. If the tool is a programming language this influence is, whether we like it or not, an influence on our thinking habits.
-- Edsger Dijkstra, 計算機科學家


抽象化和和模糊化是完全不同的…抽象的目的不是去模糊它,而是建立一種新的、能夠絕對精確的語意層。
Being abstract is something profoundly different from being vague... The purpose of abstraction is not to be vague, but to create a new semantic level in which one can be absolutely precise.
-- Edsger Dijkstra


除了數學外,精通母語也是一個勝任程式設計師的重要資產。
Besides a mathematical inclination, an exceptionally good mastery of one's native tongue is the most vital asset of a competent programmer.
-- Edsger Dijkstra


C 讓你很容易搬石頭砸自己的腳;C++ 雖然比較不容易做到,但是如果做到的話,你可能會打爛整隻腳。
C makes it easy to shoot yourself in the foot; C++ makes it harder, but when you do, it blows away your whole leg.
-- Bjarne Stroustrup, C++ 程式語言開發者

大部分的錯誤都可以簡單地修正,困難在於如何找到問題所在。
Commentary: most debugging problems are fixed easily; identifying the location of the problem is hard.
-- 不知道是誰


考慮到目前我們電腦程式的悲慘狀況,軟體開發顯然還是門魔法,還不能稱他為一個工程學科。
Considering the current sad state of our computer programs, software development is clearly still a black art, and cannot yet be called an engineering discipline.
-- Bill Clinton, 美國前總統


有很長一段時間,我一直很困擾,為什麼有的東西如此地昂貴、如此前瞻、卻也如此沒用。
同時我也發現,電腦是一個很笨的機器,但是他卻可以做到難以置信的聰明事;而程式設計師是聰明的人,卻始終做些難以置信的蠢事。簡而言之,他們是絕配。
For a long time it puzzled me how something so expensive, so leading edge, could be so useless, and then it occurred to me that a computer is a stupid machine with the ability to do incredibly smart things, while computer programmers are smart people with the ability to do incredibly stupid things. They are, in short, a perfect match.
-- Bill Bryson, author, from Notes from a Big Country


只要有足夠的眼睛,就可以讓所有的 Bug 浮現(也就是,有足夠多的測試者和開發者,幾乎所有的問題都可以很快地發現、並且被修正)
Given enough eyeballs, all bugs are shallow (e.g., given a large enough beta-tester and co-developer base, almost every problem will be characterized quickly and the fix obvious to someone).
-- Eric S. Raymond, programmer and advocate of open source software, from The Cathedral and the Bazaar


良好的程式碼是自己最好的文件。
當你打算加上註解的時候,先問問自己:「我要如何改善才能讓這段程式碼不需要註解?」
改善自己的程式碼、然後再註解,這樣可以讓他更清楚。
Good code is its own best documentation. As you're about to add a comment, ask yourself, 'How can I improve the code so that this comment isn't needed?' Improve the code and then document it to make it even clearer.
-- Steve McConnell, software engineer and author, from 《Code Complete》


嘿!編譯過了!可以出貨了!
Hey! It compiles! Ship it!
-- 不知道是誰


在每個寫得很好的大程式裡,都是寫得很好的小程式。
Inside every well-written large program is a well-written small program.
-- Charles Antony Richard Hoare, 電腦科學家


沒有一個經過倫理訓練的軟體工程師會同意去寫一個「摧毀巴格達」的程序。基本的專業倫理會要求他寫一個「摧毀城市」的程序,然後再把「巴格達」當參數傳進去。
It should be noted that no ethically-trained software engineer would ever consent to write a DestroyBaghdad procedure. Basic professional ethics would instead require him to write a DestroyCity procedure, to which Baghdad could be given as a parameter.
-- Nathaniel S. Borenstein, 電腦科學家


管理程式設計師就像放養貓一樣。
Managing programmers is like herding cats.
-- 不知道是誰


用程式碼行數來衡量進度,就像用重量來評估飛機的建造進度一樣。
Measuring programming progress by lines of code is like measuring aircraft building progress by weight.
-- Bill Gates, 微軟共同創辦人


用那些被批評成很差的語言所寫的好程式,遠比用那些宣稱美妙的語言來的多。
More good code has been written in languages denounced as bad than in languages proclaimed wonderful -- much more.
-- Bjarne Stroustrup, 《The Design and Evolution of C++》


程式必須是要寫給人看得,讓電腦能執行只是附加功能。
Programs must be written for people to read, and only incidentally for machines to execute.
-- Harold Abelson 和 Gerald Jay Sussman,
電腦科學家、《The Structure and Interpretation of Computer Programs》作者


真正的程式設計師不為他們的程式碼註解;如果程式碼很難寫,那他理所當然也應該很難懂。
Real programmers don't comment their code. If it was hard to write, it should be hard to understand.
-- 不知道是誰


簡單是可靠性的前提。
Simplicity is prerequisite for reliability.
-- Edsger Dijkstra


C 程式語言--這是一種結合了組合語言的靈活性和組合語言的強大能力的語言。
The C programming language -- a language which combines the flexibility of assembly language with the power of assembly language.
-- 不知道是誰


前 90% 的程式碼用了 90% 的開發時間,但是剩下的 10% 還需要另外 90% 的開發時間。
The first 90% of the code accounts for the first 90% of the development time. The remaining 10% of the code accounts for the other 90% of the development time.
-- Tom Cargill, 貝爾實驗室的物件導向程式專家


很重要的一點:加入一個功能的成本不是只有為了這項功能寫程式所花的時間,還要包含他對以後擴展造成阻礙。當然,只要有足夠的時間,所有要求的功能是都能被實作出來的;但是隨著這些功能出現的,通常會是一個脆弱的程式庫,脆弱到就算只是一個應該是極度簡單的新想法,都需要越來越長的時間和已經存在的網路糾纏。處理的秘訣就是只挑選那些不會和其他功能打架的功能。
The important point is that the cost of adding a feature isn't just the time it takes to code it. The cost also includes the addition of an obstacle to future expansion. Sure, any given feature list can be implemented, given enough coding time. But in addition to coming out late, you will usually wind up with a codebase that is so fragile that new ideas that should be dead-simple wind up taking longer and longer to work into the tangled existing web. The trick is to pick the features that don't fight each other.
-- John Carmack, 電腦遊戲程式設計師


效能的關鍵在於簡潔,而不是大量的特例。除非成效非常顯著,不然應該忍住去微調它的衝動。
The key to performance is elegance, not battalions of special cases. The terrible temptation to tweak should be resisted unless the payoff is really noticeable.
-- Jon Bently 和 M. Douglas McIlroy, 貝爾實驗室的電腦科學家


最後一個用 C 寫出來的好作品,是法蘭茲‧舒伯特的第九號交響曲。(C 大調…)
The last good thing written in C was Franz Schubert's Symphony Number 9.
-- Erwin Dieterich, 程式設計師


使用 C++ 的問題在於他的語言中有很強烈的傾向,你必須要在你做任何事之前知道所有事情。
The problem with using C++ ... is that there's already a strong tendency in the language to require you to know everything before you can do anything.
-- Larry Wall, Perl 語言的開發者


越早開始寫程式,程式寫得越久。
The sooner you start to code, the longer the program will take.
-- Roy Carlson, University of Wisconsin


原型的價值在於它對你的教育,而不是程式碼本身。
The value of a prototype is in the education it gives you, not in the code itself.
-- Alan Cooper, 《The Inmates are Running the Asylum》作者


世界上只有兩種程式語言:總是被人罵的、根本沒人用的。
There are only two kinds of programming languages: those people always bitch about and those nobody uses.
-- Bjarne Stroustrup


有兩種設計軟體的方法:一種是讓它簡單到明顯地沒有缺陷,另一種則是讓它複雜到沒有明顯的缺陷。
There are two ways of constructing a software design. One way is to make it so simple that there are obviously no deficiencies. And the other way is to make it so complicated that there are no obvious deficiencies.
-- Charles Antony Richard Hoare


醜陋的程式就和醜陋的吊橋一樣:他們都比漂亮的容易崩潰;因為人們(尤其是工程人)的審美方法,是和我們處理、理解複雜事物的能力密切相關的。一個讓人難以寫出優雅程式的語言碼,同時也代表他難以寫出好的程式碼。
Ugly programs are like ugly suspension bridges: they're much more liable to collapse than pretty ones, because the way humans (especially engineer-humans) perceive beauty is intimately related to our ability to process and understand complexity. A language that makes it hard to write elegant code makes it hard to write good code.
-- Eric S. Raymond


花幾個禮拜的時間寫程式,就可以省下你幾個小時的計畫時間。
Weeks of programming can save you hours of planning.
-- 不知道是誰


如果創造了一種程式語言,可以讓程式設計師用簡單的英文來寫的話,那你會發現程式設計師不會講英文。
When a programming language is created that allows programmers to program in simple English, it will be discovered that programmers cannot speak English.

出處:http://heresy.spaces.live.com/blog/cns!E0070FB8ECF9015F!11414.entry

......
8/30/2010

openCV 在 Visual Studio 的 runtime 設定


似乎很多 openCV 的 dll 都是以 /MDd 的方式 compile 出來,所以專案設定時將 runtime library 設定成 /MDd 較不易出錯!

......

8/29/2010

iPhone 當中的 delegate(委派) 機制筆記

委派是一種簡單的設計機制。並非什麼特別的語法或者語言特性。

委派的概念簡單來說就是,一個物件幫另外一個物件處理某些任務。一個委派物件透過其 conform 的 protocol 來釐清他應該處理哪些任務。而 protocol 當中有一些 method 是設定為 optional 的,這類的 method 在 conform 該 protocol 的時候,不一定需要實作。

可以想像經理和秘書的關係,經理像是一個物件,秘書就像是一個委派物件。當經理需要傳真文件的時候,會發出一個訊息,告訴秘書(委派物件),這件事該由他來做。秘書要怎麼知道要傳真到哪裡呢?當然這個消息是由經理提供,因為秘書 conform 的 protocol 當中,有明確的規範傳真這件事情的輸入參數,所以只要提供正確的資料就能夠正確的執行代理任務。

@interface DetailViewController : UIViewController <UITableViewDelegate, UITableViewDataSource>

如上程式碼:DetailViewController 是一個 UIViewController 並且 conforms UITableViewDelegate 和 UITableViewDataSource 兩個 protocol。代表 DetailViewController 這個類型的物件可以當做 UITableView 的 delegate 和 data source。

參考資料:
iPhone Programming Concepts – The Delegate

Delegates and Protocols

Delegation pattern

設計模式複習筆記(委托機制)

Delegates and Data Sources


......

8/21/2010

OOD 物件導向設計原則

閱讀這篇好文的心得筆記:How I explained OOD to my wife

Object Oriented Principle (物件導向原則):抽象、繼承與多型,就像是基本的單字和文法,是建構出一篇好文章的基本工具。而 Object Oriented Design (物件導向設計) 則是站在更高一層,探討如何利用這些基本的工具,寫出一篇好文章。

為什麼需要 OOD ?

軟體設計為了解決現實生活遇到的問題,而現實就是不斷的演進和改變。所以一個被良好設計的軟體也應該要能適應這樣的改變。好的軟體具備了三個要素:1. 容易因應改變、2. 易於擴展、3. 可重用的。

要怎麼做到這三點呢,前人提出了許多設計原則,可以簡要成一個 SOLID 口訣的五大原則

S = Single Responsibility Principle 單一責任原則
O = Opened Closed Principle 開放封閉原則
L = Liscov Substitution Principle 虎父無犬子原則
I = Interface Segregation Principle 介面簡單原則
D = Dependency Inversion Principle 依賴反轉原則

以下一一說明:

1. 單一責任原則

要去修改一個 class 不應該有超過一種的理由 (也就是說,一個 class 應該只有一項責任)
如果你的 class 因為超過一種理由而需要被改變,那代表這個 class 需要進一步被細分為更小的 class。

因為每一種責任都是一種改變的可能性,當 class 擁有多重任務的時候,程式碼之間關係會變得錯綜複雜。


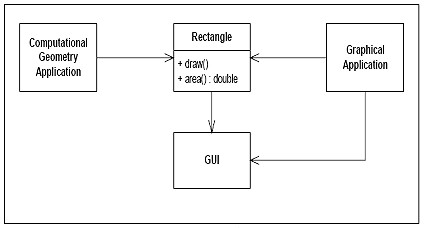
如上圖的例子來說,Rectangle 這個 class 做了兩件事:

1. 計算長方形的面積  2. 將長方形畫到UI上面

這意味著在 Geometry Application 中,因為要用到 Rectangle class 所以也會間接的把給 Graphic Application 用的方法或者所需要的 library 給涵蓋進來,反之亦然。再者,當Geometry Application 需要 Rectangle class 做一些改變的時候,勢必也將會影響到 Graphic Application 的運作,需要耗費時間修改確定其影響。因此將 Rectangle class 在進一步細分 Rectangle 和 RectangleUI 兩個 class 比較適當。


2. 開放封閉原則

"Open for Extension, but Closed for Modification"

簡單來說,擴展一個 class 的行為,只需要增加程式碼,而不用對現有程式碼做修改。就好像你要改變你的造型,只需要穿上不一樣的衣服,而不用改變你的身體。


上圖的 class 階層違反了開放封閉原則。當 Server 因某種需求需要該變,Client 也需要跟著改變。就像 client 瀏覽器的實作若是和 server 緊緊相關連的話,那麼臨時要換另外一種 server,client 端的 code 也需要跟著改變。


如上圖,假若兩者之間有一個抽象層 (Abstract Server),而真正的 server 實現了這個抽象 server,那麼假若 server 需要改變就不會影響到 client 端的實作。

因此系統當中的核心觀念若能抽象得當,將來在遇到改變或者擴展需求的時候就會比較容易。


3. 虎父無犬子原則

子類別應該能夠取代其父類別。換句話說,function 當中使用指向 base type 的 reference 應該能夠傳 derived type 的物件進去,而不需要任何檢查。

這不就是多型嗎?

Liskov's Substitution Principle 就是用來確保繼承使用得當的原則。


如上圖,Ostrich 是一種鳥,但是他其實不會飛,違反了這個原則。

違反了這個原則,當你將子類別傳入父類別的參考,你無法確定發生什麼奇怪的行為;其二,針對父類別成功的單元測試,在子類別身上永遠會失敗。


4. 介面簡單原則

"Clients should not be forced to depend upon interfaces that they do not use" 保持介面的簡單明瞭!

假如公開太多的方法,會讓介面變得肥大且混亂,此外,凡是當另外一個 class 要實現這個介面的時候,將也需要一同實現那些實際上並不需要的方法。因此介面的設計原則為,他們有明確的任務,容易了解且可重用。


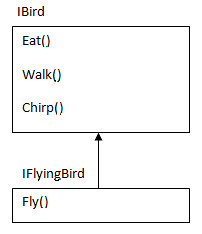
如上圖例,IBird 介面當中若包含了 Fly 方法,但是 Ostrich 這種鳥並不會飛,因此應該在把這個特定的方法,分出一個介面如上圖。


5. 依賴反轉原則

"高階模組不應該依賴低階模組,而是兩者都應該依賴抽象"

車子是由需多元件組成,像是引擎、輪胎等等。然而這些元件都是可外掛的,當你需要更換這些元件的時候,你只需要確認這些元件和你的車子是可匹配的。

假如這些元件並不具備外掛的特性時,如果你的引擎壞掉了,而相同一模一樣的引擎也賣光了,這時可能就要修改車子來配合別的引擎,或者換一台車!

車子就好像一個高階的模組,而他依賴低階的模組像是引擎和輪子。但是,與其直接依賴引擎和輪子,車子應該要倚賴的是引擎和輪子抽象的規格,那麼只要那些符合規格的引擎和輪子都可以讓這輛車子順利啟動。


如上圖的 Car class,有兩個抽象的 interface 屬性,而非具體的型別。因此這輛車子可以接受任何實現了這個介面規格的引擎和輪子。

當我們不貫徹這個原則的話有可能發生:
1. 高階的模組需要直接使用低階的 class
2. 當低階 class 需要改變的時候,高階模組也需要相應的改變
3. 不易重用


當然,還有許多 OOD Priciple

Composition over Inheritance” : This says about favoring composition over inheritance.
“Principle of least knowledge” : This says that "the less your class knows, the better".
“The Common Closure Principle” : This says that "related classes should be package together"
“The Stable Abstractions Principle” : This says that "the more stable a class is, the more it must consist of abstract class."

......

8/10/2010

[Mac OS X] 如何得到 UIImage/CGImage 的 piexl 資料

透過 UIImagePickerControllerDelegate 取得影像的 UIImage 資料之後,該如何取得 UIImage 當中的像素資料,以進行接下來的影像處理,在此記錄一下。

首先參考的是這篇 Getting the pixel data from a CGImage object,當中提到的第一個方法 CGDataProviderCopyData 在 Mac OS X 10.5 以後才出現,相當方便但是無法確定自己得到的 color model 是否和影像一致,如當中的 WARNING 所說明:

WARNING: The pixel data returned by CGDataProviderCopyData has not been color matched and is in the format that the image is in, as described by the various CGImageGet functions (see for Getting Information About an Image more information)

比較保險的作法,也就是在 Mac OS X 10.5 之前的作法,是自行 create 一個 bitmap context,然後利用 CGDrawImage 將影像畫到這個你指定格式的 context 上頭,如此一來你就可以利用 CGBitmapContextGetData 來取得影像的像素資料!

IMPORTANT: 以下範例 creates a bitmap context with a 8-bits per component ARGB color space, draws the source image to this context, then retrieves the image bits in this color space from the context. Regardless of what the source image format is (CMYK, 24-bit RGB, Grayscale, and so on) it will be converted over to this color space. For more information about creating bitmap contexts for other pixel formats, see the Quartz 2D Programming Guide.

其中在利用 CGBitmapContextCreate 建立 bitmap context 時候有一個 colormodel 參數,該資料當中的 CGColorSpaceGenericRGB 已經被 deprecated 了,解決的方案是利用 CGColorSpaceCreateDeviceRGB() 取代,請參考 Warning: kCGColorSpaceGenericRGB is deprecated

針對像素處理完畢之後,需要由處理過後的 CGImage 創建一個新的 UIImage 然後指定到你要顯示的地方:
newImgRef = CGBitmapContextCreateImage(cgctx);
UIImage *newimg = [UIImage imageWithCGImage:newImgRef];
imageView.image = newimg;

參考上述兩點,整理的程式碼如下:

- (void)imagePickerController:(UIImagePickerController *)picker 
        didFinishPickingImage:(UIImage *)image
        editingInfo:(NSDictionary *)editingInfo 
{
 CGImageRef imageRef = image.CGImage;
 
 // Create the bitmap context
        cgctx = CreateARGBBitmapContext(imageRef);
        if (cgctx == NULL) 
        { 
        // error creating context
        return;
        }
 
 // Get image width, height.
        size_t w = CGImageGetWidth(imageRef);
        size_t h = CGImageGetHeight(imageRef);
        CGRect rect = {{0,0},{w,h}}; 
 
 // Draw the image to the bitmap context. Once we draw, the memory 
        // allocated for the context for rendering will then contain the 
        // raw image data in the specified color space.
        CGContextDrawImage(cgctx, rect, imageRef); 
 
 // Now we can get a pointer to the image data associated with the bitmap
        // context.
        void *data = CGBitmapContextGetData(cgctx);
 imagePtr = data;
 unsigned char A, R, G, B;
 
        if (imagePtr != NULL)
        { 
            // **** You have a pointer to the image data ****  
            // **** Do stuff with the data here ****
     for (int x = 0; x < w; x  ) {
         for (int y = 0; y < h; y  ) {
  
      A = imagePtr[(x (y*w))*4 + 0];
      R = imagePtr[(x (y*w))*4 + 1];
      G = imagePtr[(x (y*w))*4 + 2];
      B = imagePtr[(x (y*w))*4 + 3];  
  }
     }
        }
 
 newImgRef = CGBitmapContextCreateImage(cgctx);
 UIImage *newimg = [UIImage imageWithCGImage:newImgRef];
 
 
 // do something with selectedImage and originalImage
 imageView.image = newimg;
        [picker dismissModalViewControllerAnimated:YES];
}


其中的 CreateARGBBitmapContext 方法如下:

CGContextRef CreateARGBBitmapContext (CGImageRef inImage)
{
    CGContextRef    context = NULL;
    CGColorSpaceRef colorSpace;
    void *          bitmapData;
    int             bitmapByteCount;
    int             bitmapBytesPerRow;
 
 // Get image width, height. We'll use the entire image.
    size_t pixelsWide = CGImageGetWidth(inImage);
    size_t pixelsHigh = CGImageGetHeight(inImage);
 
    // Declare the number of bytes per row. Each pixel in the bitmap in this
    // example is represented by 4 bytes; 8 bits each of red, green, blue, and
    // alpha.
    bitmapBytesPerRow   = (pixelsWide * 4);
    bitmapByteCount     = (bitmapBytesPerRow * pixelsHigh);
 
    // Use the generic RGB color space.
    colorSpace = CGColorSpaceCreateDeviceRGB();
    if (colorSpace == NULL)
    {
        fprintf(stderr, "Error allocating color space\n");
        return NULL;
    }
 
    // Allocate memory for image data. This is the destination in memory
    // where any drawing to the bitmap context will be rendered.
    bitmapData = malloc( bitmapByteCount );
    if (bitmapData == NULL) 
    {
        fprintf (stderr, "Memory not allocated!");
        CGColorSpaceRelease( colorSpace );
        return NULL;
    }
 
    // Create the bitmap context. We want pre-multiplied ARGB, 8-bits 
    // per component. Regardless of what the source image format is 
    // (CMYK, Grayscale, and so on) it will be converted over to the format
    // specified here by CGBitmapContextCreate.
    context = CGBitmapContextCreate (bitmapData,
          pixelsWide,
          pixelsHigh,
          8,      // bits per component
          bitmapBytesPerRow,
          colorSpace,
          kCGImageAlphaPremultipliedFirst);
    if (context == NULL)
    {
        free (bitmapData);
        fprintf (stderr, "Context not created!");
    }
 
    // Make sure and release colorspace before returning
    CGColorSpaceRelease( colorSpace );
 
    return context;
}


參考資料:
如何把照片加到 iPhone Simulator 的 Library 當中
http://www.youtube.com/watch?v=1NqHnYGNAp8

OpenGL ES from the Ground Up: Table of Contents
http://iphonedevelopment.blogspot.com/2009/05/opengl-es-from-ground-up-table-of.html

如何得到 CGImage 的 pixel data
http://developer.apple.com/mac/library/qa/qa2007/qa1509.html

Warning: kCGColorSpaceGenericRGB is deprecated
http://iphoneinaction.manning.com/iphone_in_action/2009/06/warning-kcgcolorspacegenericrgb-is-deprecated.html

Convert CGImage to UIImage
http://www.iphonedevsdk.com/forum/iphone-sdk-development/21806-convert-cgimage-uiimage.html

......

8/04/2010

[C] 測量程式執行時間

#include <time.h>
#include <stdio.h>
#include <stdlib.h>

int main(void)
{ 
    int count,a;
    clock_t c0, c1;
    double cputime;
    c0 = clock();

    /* foo()  */
    for (count = 1l; count < 12345678; count  ) {
        a = 64*64;
    }
    /* end foo( 0 */

    c1= clock();
    cputime = (c1 - c0)/(CLOCKS_PER_SEC );

    printf ("\tElapsed CPU time test:   %f  sec\n",cputime);

    return 0;
}


HMM 程式碼學習資源

Hidden Markov Models in C#
http://crsouza.blogspot.com/2010/03/hidden-markov-models-in-c.html#using
http://www.codeproject.com/Articles/69647/Hidden-Markov-Models-in-Csharp.aspx

用Excel徹底了解Baum-Welch Algorithm流程
An Interactive Spreadsheet for Teaching the Forward-Backward Algorithm (2002)
http://www.cs.jhu.edu/~jason/papers/#tnlp02

Linux平台的HMM Source Code
Hidden Markov Model (HMM) Software: Implementation of Forward-Backward, Viterbi, and Baum-Welch algorithms
http://www.kanungo.com/software/software.html#umdhmm

A C++ Implementation of Hidden Markov Model
http://webdocs.cs.ualberta.ca/~lindek/hmm.htm

在 Mac 上跑 CUDA

1. 先按照 Getting Start MacOS 文件上的步驟依序將 Driver, Toolkit 和 SDK 安裝完成。

其中有一個步驟必須設定環境變數可以參考如下:http://macuknow.com/node/4674

於終端機上輸入 "vi ~/.bash_profile " (於家目錄下開啟名為.bash_profile之文字檔)
先按一下 "i" 鍵 插入文字, 並將下列兩行貼上

export PATH=/usr/local/cuda/bin:$PATH
export DYLD_LIBRARY_PATH=/usr/local/cuda/lib:

再按一下 "esc" 鍵 結束編輯
並鍵入 ":wq" 儲存離開

2. 安裝完成後,驗證安裝

在 terminal window 當中執行 "ncvv -V"

3. 在 CUDA SDK 當中有許多範例程式可以參考,必須先他們 compile 一遍產出執行檔。

到 "/Developer/GPU Computing/C" 路徑下,執行 "make" 指令,於是這些範例程式的執行檔都會被輸出至
"/Developer/GPU Computing/C/bin/darwin/release" 當中。於是可以執行 deviceQuery 這個範例看看自己 GPU
的硬體規格。

4. 目前寫程式仍然是在 windosw 當中利用 VS2008,測試效能則在有 CUDA enabled 顯示卡的小白上執行,
所以該如何將寫好的 cuda 程式碼,放進 mac 編譯執行呢!

4-1 CUDA SDK 的路徑 "/Developer/GPU Computing/C/src/" 下有很多範例專案,可以在此隨便複製一個然後
在偷偷更名,並且將資料夾當中的檔案置換成自己寫的 CUDA 程式碼。

4-2 這邊要注意,如果你的專案必須要 include 什麼 .h 檔的話,需要自行修改當中的 Makefile。

4-3 如果專案當中有使用到 CImag 的話,在 Makefile 當中的最底下那一行 "include ../../common/common.mk",
找到 common.mk 這個檔案,並且加入以下:

# for CImg
LINK := g++ -fPIC -O2 -lm -lpthread -L/usr/X11R6/lib -lm -lpthread -lX11

因為 CImg 有使用到 X11 的一些 function 所以必須要把這個連結加進去 (http://cimg.sourceforge.net/reference/group__cimg__overview.html)

4-4 compile 的話就將 terminal window 指到專案路徑下,執行 "make" 指令,就會輸出執行檔至
"/Developer/GPU Computing/C/bin/darwin/release" 當中

4-5 需要注意的是,如果有用到 CImg 當中顯示影像或者相關影像編輯的功能,則必須透過 X11 來執行這個執行檔
方法是:打開 X11,將路徑指到該執行檔之路徑,執行 "./cudaApp"

...

4/17/2010

[objC] 記憶體管理

今天看了一些記憶體管理的章節,目前仍然有些許疑惑,不過將目前為止的理解記錄一下。

ObjC 當中的物件均以指標形式創建傳遞,每一個物件都會有一個 reference count,當物件被配置記憶體、被創建、或被複製時,其 reference count 都會初始為 1,任何對於這個物件施行操作的方法,都必須控制好這個 reference count,操作 reference count 可以透過每個繼承 NSObject 物件的 instant method: retain(+1) 和 release(-1)。

當 reference count 變成 0 的時候代表此物件已經不再被任何程式需要,因此就會被消滅,因此當該物件被多個擁有者使用的時候,必須小心的操作其 reference count,避免還有人要使用該物件時,其 reference count 已經變設成 0!

對類別當中的成員物件進行 存取子 (accessor) 操作時,需遵循: 1. 先將傳入物件 retain(+1) 2. 再 release 成員物件 3. 將傳入物件指向成員物件。

一般的情形下:你 New 了一個 A 類別的物件 a,B 類別的物件 b 為其成員變數 (b 的 ref count =1),現在你要透過 setter 方法從外部傳入一個物件 b' 去設定 b 的值,首先你 new 了一個 b' 物件 (b' 的 ref count =1),傳入 setter 後 b' retain (b' 的 ref count =2),接著 release b (b 的 ref count =0, 被摧毀),然後將 b' 指向 b,此時 b 和 b' 指向相同物件。

將 b' 物件傳入後,需要將 b' release 掉,因此 (b' 和 b 的 ref count = 1),當物件 a 使用完畢後則要再 release b,因此 (b' 和 b 的 ref count = 0, 被摧毀)。

如果先 release 再 retain 的話遇到傳入 b' 和 b 原本就指向相同物件的情形,將導致成員物件先被解構,而無法賦值...

.......

4/16/2010

[Programming] 小心在 for 迴圈當中的 if

如果要有條件的去loop一個迴圈,那麼不要自以為聰明的先算好會有多少個index會進去那個迴圈,如果進去該迴圈的總數是重要的,那麼就放一個counter去數!

...

2/25/2010

不必將 CUDA Project 放到 SDK 資料夾下的方法

我忘記補充,我今天早上搞定CUDA在VC裡的設定, 就不需要把程式放在
“C:\Program Files\NVIDIA\NVIDIA GPU Computing SDK\C\src\”

安裝完CUDA SDK後
1. 從[C:\Documents and Settings\All Users\Application Data\NVIDIA Corporation\NVIDIA GPU Computing SDK\C\common]
copy Cuda.Rules to
[C:\Program Files\Microsoft Visual Studio 8\VC\VCProjectDefaults]

2.開一個專案,在project按右鍵選custom build rules
勾選CUDA Build Rule

3. VC Option -> VC++ Directories -> include files
add [C:\Documents and Settings\All Users\Application Data\NVIDIA Corporation\NVIDIA GPU Computing SDK\C\common\inc]

4. VC Option -> VC++ Directories -> include files
add [C:\Documents and Settings\All Users\Application Data\NVIDIA Corporation\NVIDIA GPU Computing SDK\C\common\lib]

5.我的電腦->系統內容->環境參數->系統變數
CUDA_BIN_PATH [C:\CUDA\bin]
CUDA_INC_PATH [C:\CUDA\include]
CUDA_LIB_PATH [C:\CUDA\lib]

...

1/12/2010

[C#] the error "Object reference not set to an instance of an object"

會發生這個 error 的原因是: The code is trying to access a member of a reference type variable that is set to null.

當使用automatic properties 的時候,如果沒有初始化 value type 的 property 會是 0, reference type 則會是 null。因此在建構子當中要針對 properties 做初始化的動作 ( "new" )

參考: http://blogs.msdn.com/csharpfaq/archive/2004/05/06/127647.aspx

...

1/04/2010

[C# 筆記] Collections and Generics 集合和泛型

  • Collections 解決 System.Array 只能裝載同一型別之物件和固定長度的容量之限制。Generics 提供更高的 type safety 和 performance。

  • System.Collections 這個 namespace 實現了許多 interfaces 像是: ICollection, IComparer, IDictionary, IDictionaryEnumerator, IEnumerable, IEnumerator, IHashCodeProvider, IList

  • The Role of ICollection

    • ICollection 是最主要的 interface,他允許你 (a) 取得 container 內物件的數量 (b) the thread safety of the container (c) the ability to copy the contents into a System.Array type

    • public interface ICollection : IEnumerable
      {
      int Count { get; }
      bool IsSynchronized { get; }
      object SyncRoot { get; }
      void CopyTo(Array array, int index);
      }

  • The Role of IDictionary
    • A dictionary is simply a collection that maintains a set of name/value pairs

    • public interface IDictionary : ICollection, IEnumerable
      {
        bool IsFixedSize { get; }
        bool IsReadOnly { get; }
        // Type indexer; see Chapter 12 for full details.
        object this[object key] { get; set; }
        ICollection Keys { get; }
        ICollection Values { get; }
        void Add(object key, object value);
        void Clear();
        bool Contains(object key);
        IDictionaryEnumerator GetEnumerator();
        void Remove(object key);
      }


  • The Role of IDictionaryEnumerator

    • IDictionaryEnumerator is simply a strongly typed enumerator, given that it extends IEnumerator by adding the following functionality:

      public interface IDictionaryEnumerator : IEnumerator
      {
        DictionaryEntry Entry { get; }
        object Key { get; }
        object Value { get; }
      }

  • The Role of IList

    • provides the ability to insert, remove, and index items into (or out of) a container

    • public interface IList : ICollection, IEnumerable
      {
        bool IsFixedSize { get; }
        bool IsReadOnly { get; }
        object this[ int index ] { get; set; }
        int Add(object value);
        void Clear();
        bool Contains(object value);
        int IndexOf(object value);
        void Insert(int index, object value);
        void Remove(object value);
        void RemoveAt(int index);
      }

  • The Class Types of System.Collections